
A lot of door repaint jobs start the same way. The walls have just been freshened up, the trim looks cleaner, and suddenly the doors are what you notice. Scuffs around the handle, yellowing on older enamel, chipped lower rails from vacuum knocks, and that tired shine that makes a whole hallway feel older than it is.
Repainting interior doors can absolutely be a good DIY project. It can also go wrong faster than many homeowners expect. Doors are high-touch surfaces, they catch light at eye level, and every brush mark sits right where people can see it. In Melbourne homes, that matters even more in older houses, apartments, rentals, and pre-sale refreshes where worn doors stand out against otherwise tidy interiors.
The difference between a passable DIY result and a professional standard usually comes down to three things. Preparation, paint choice, and patience. If you get those right, repainting interior doors is worth doing. If you rush any of them, the finish usually tells on you.
Table of Contents
- Planning Your Project Tools Materials and Paint
- The Critical Step Professional Surface Preparation
- Application Techniques for a Flawless Finish
- Patience is Key Drying Curing and Reassembly
- Common DIY Mistakes and How to Fix Them
- When to Hire a Professional Painter in Melbourne
Planning Your Project Tools Materials and Paint
Good door painting starts before the lid comes off the can. If you're missing the right sanding grit, using the wrong filler, or trying to force wall paint onto a door, you're already making the job harder.
In Australian homes, interior doors often get repainted as part of a broader maintenance cycle rather than as a one-off cosmetic fix. An Australian painting guide notes that high-traffic and moisture-prone interior areas such as bathrooms, hallways, entryways, and laundries often need repainting every 2 to 3 years due to scuffs, fingerprints, and moisture exposure, which is useful context for doors in those same spaces because they cop the same wear (interior repaint timing guide).
What you need before you start
Use a proper kit, not whatever is left in the shed.
- Drop sheets. Canvas is better than thin plastic for occupied homes because it stays put underfoot.
- Painter's tape. Useful for protecting hinge leaves, strike plates, adjacent trim, and flooring.
- Screwdriver set. Needed to remove handles, latch plates, and in some cases the door itself.
- Sugar soap or degreaser. Essential around handles, edges, and lower rails where hand oils build up.
- Filler and putty knife. For dents, screw holes, chips, and worn edges.
- Sandpaper in a few grades. Coarser for repairs, finer for scuff sanding and denibbing.
- Sanding sponge or sanding block. Helps keep pressure even on profiles and flat faces.
- Tack cloth or microfibre cloth. Dust left behind ruins finishes.
- Primer. Only where needed, not blindly over everything.
- Brushes and mini rollers. Angled sash brush for details, small roller for flat sections.
- Paint tray and liners. Cleaner and easier to manage than dipping from the tin.
- Trestles or sawhorses. Useful if the door is coming off.
- Door wedges or stops. Handy when painting in place.
- Specialist trim or door paint. Better levelling and wear resistance than standard wall paint.
If you're assembling your kit from scratch, Newline's checklist on tools you will need to paint your home is a practical place to cross-check the basics.
Choosing the right paint system
The best system depends on what the door is made of and what is already on it.
Bare timber usually needs primer before topcoats. Previously painted doors in sound condition may only need spot priming where repairs or sand-throughs expose raw material. MDF doors need extra care on edges and any swollen or damaged areas. Hollow-core doors need a lighter touch because you can't sand them aggressively without risking damage to the skin.
Dulux and Haymes are commonly used in Melbourne repaint work because their trim and enamel ranges generally level better and wear better than budget products. That is why painters favour better paint. It isn't branding. It's that the finish stays cleaner, flows out better, and is less likely to drag when you're working a door quickly.
Practical rule: Spend more on the coating and less on fixing a cheap finish later.
Sheen matters as much as colour. Doors are touched constantly, so low-sheen wall paint usually isn't the right choice.
| Sheen | Appearance | Durability | Best For |
|---|---|---|---|
| Satin | Soft, low-reflective finish | Good | Bedrooms, lower-traffic doors, heritage interiors where a softer look suits the room |
| Semi-gloss | Noticeable sheen without looking too hard | Very good | Most interior doors, trims, hallways, bathrooms, and family homes |
| Gloss | High reflectivity and sharp look | Strong surface performance | Statement doors, contemporary finishes, or homes matching existing gloss trim |
If you're weighing water-based and oil-based style finishes, it's worth looking at adjacent coating categories too. This guide on comparing hardwood floor topcoats in Cumming is about floors, not doors, but it gives useful context on how different coating types behave in wear, cure, and appearance.
The Critical Step Professional Surface Preparation
Most disappointing door repaints don't fail because of the final coat. They fail because the surface underneath wasn't ready for it.
That is why professionals spend so much time on preparation. The reliable workflow for repainting interior doors is to remove hardware or fully mask it, clean and degrease, repair gouges with filler, sand the whole door to create a fine key, remove dust with a tack cloth, then apply primer only where needed before finish coats (professional door prep workflow).
Why prep decides the finish
Paint needs two things from the surface. It needs cleanliness and it needs grip. A door that looks clean often isn't. Around the handle, edge pulls, and lower half, there is usually a film of skin oil, polish residue, grime, and old cleaning product.
If you paint over that, the coating may go on evenly for a day or two, then start showing adhesion issues, strange sheen changes, or localised peeling. That's why sanding only the damaged spots is not enough. The whole face needs to be scuffed so the new coating can bond consistently.

The prep sequence that actually works
This is the order that gives the fewest problems.
- Remove hardware first. Handles, striker plates, and removable catches should come off if possible.
- Wash before sanding. Degreasing first stops you grinding grime into the old coating.
- Fill damage properly. Let filler dry fully, then shape it flush.
- Sand the entire surface. Not just the repaired spots.
- Remove dust thoroughly. Vacuum, wipe, then tack cloth.
- Prime only where needed. Bare patches, repairs, and tricky colour changes usually need it.
For MDF doors, the same logic applies, but swollen fibres and exposed edges need a bit more care. If that's the substrate you're working with, this guide on how to paint MDF is worth reading before you start.
If a door has old chips, grime around the handle, and dents at vacuum height, prep isn't the boring part. Prep is the job.
Panel doors need extra discipline during prep and painting. Work from the recessed sections outward so paint doesn't build up in corners and along profile edges. On Melbourne jobs, I also treat top and bottom edges carefully because doors can move with humidity changes. Painting those edges too heavily can lead to binding once the door is rehung.
Application Techniques for a Flawless Finish
After the door is prepped, the application method determines the appearance of the finished surface in daylight. Many DIY projects diverge into two categories at this stage. Surfaces are either reasonably neat or exceptionally smooth.
Different tools leave different signatures. A brush leaves texture if overloaded. A roller can leave stipple if the nap is too heavy or the paint is too thick. A spray setup can produce the cleanest look, but only if the masking, product choice, and environment are controlled.
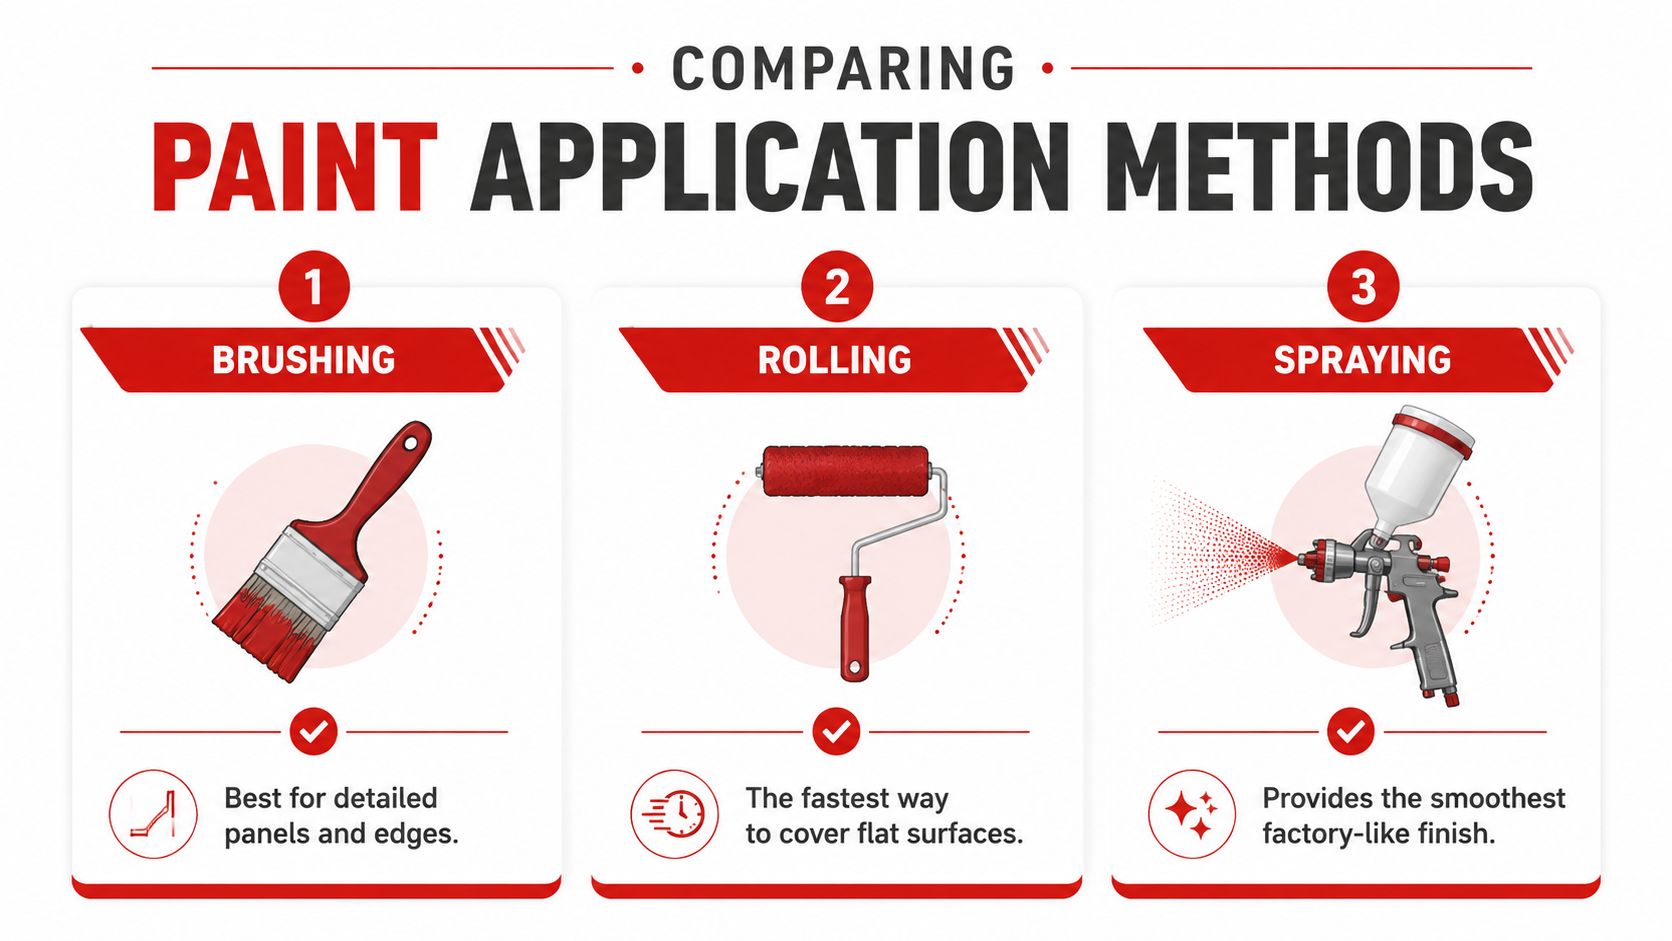
Brush roller or spray
Here is the practical comparison.
| Method | Best use | What works well | What usually goes wrong |
|---|---|---|---|
| Brush | Profiles, edges, touch-ups, heritage detail | Good control in mouldings and corners | Visible brush lines, heavy paint in corners, lap marks |
| Roller | Flat and lightly detailed doors | Faster coverage, more uniform film build | Orange peel texture, stipple, missed edges |
| Spray | Full door sets, premium finish work, pre-sale presentation | Smoothest factory-like finish | Overspray risk, heavy setup, not ideal for casual DIY |
For a homeowner doing one or two doors, brush and mini roller is usually the most realistic combination. Use the brush where the roller can't reach cleanly, then lay off flatter areas with a quality mini roller.
For a smooth look on flat faces, the roller matters almost as much as the paint. High-density foam or a fine microfiber mini roller usually gives a neater finish than a general-purpose wall roller.
A floor coating tutorial can help illustrate the same principle of even film build and edge control across broader timber surfaces. Bulls Eye Repair's floor painting tutorial is useful here because the same habits apply. Keep coats controlled, maintain a wet edge, and don't flood corners.
A quick visual reference can help before you commit to a method.
How to paint panel doors without heavy edges
Panel doors punish rushed technique. The correct order matters because it helps you move excess paint away from corners rather than trapping it there.
- Start inside the panels. Paint the recessed detail first.
- Move to the vertical sections. Keep the film even and don't let the roller run dry.
- Finish with rails and outer stiles. This helps blend overlaps more cleanly.
- Check corners before walking away. That's where sags begin.
Spraying is the closest thing to a factory-style finish, especially on full door sets. It also demands proper masking, clean airflow, and a controlled setup. In occupied houses or apartments, that's one of the main reasons professional teams get a better result. The actual spraying is only part of it. The containment and sequencing are just as important.
Patience is Key Drying Curing and Reassembly
A door can feel dry and still be vulnerable. That catches people out all the time. They touch it, rehang it, close it against the stop, and then wonder why it sticks or shows marks around the latch side.
Drying is the short-term stage where the surface stops feeling wet. Curing takes longer. That is when the paint hardens enough to cope with pressure, handling, and repeated contact.
Dry is not cured
If you're painting a door flat on trestles, let one side dry completely before flipping it. Rushing that step risks pressure marks and imprints, especially if the supports press into paint that still has softness underneath.
The smartest approach is simple.
- Use thin coats so each layer dries more evenly.
- Respect recoat windows listed by the paint manufacturer.
- Denib lightly between coats if the surface feels dusty or rough.
- Avoid fully shutting the door too soon if paint is still vulnerable around edges and stops.
If you're unsure how long to leave between coats, this guide on how long to wait between paint coats gives a useful general reference point.
Fresh paint doesn't fail because it was touched once. It fails because people put a door back into normal use before the coating was ready.
Rehanging without damaging fresh paint
Reassembly is a careful job, not a rush job.
Use clean hands or gloves when handling the door back onto hinges. Fit hardware without dragging metal across fresh paint. If the latch side is tight, don't force the door shut to test it. Check hinge alignment and clearances first.
A few practical habits help:
- Protect the floor and adjacent trim during rehanging.
- Tighten screws by hand at final stage if you want more control near fresh paint.
- Test swing gently before closing it fully.
- Leave the latch side slightly open if needed until the coating hardens further.
This is one of the big differences between a neat-looking job on day one and a durable job a week later.
Common DIY Mistakes and How to Fix Them
The common failures in repainting interior doors are predictable. Brush marks, drips, peeling, sticky doors, and uneven sheen are repeatedly linked to skipped cleaning, skipped sanding, or coats that were applied too heavily (common interior door repaint defects).
That isn't bad luck. It's usually process.
What goes wrong most often
Brush marks usually mean the paint didn't level well, the brush was poor quality, or the painter kept going back over tacky sections. The fix is to let it dry, sand it smooth, remove dust, and recoat with a better brush or a roller-assisted method.
Drips and runs almost always come from heavy coats, especially on panel edges and vertical faces. Let the run harden, shave or sand it back carefully, then repaint the section in a thinner coat.
Uneven sheen is common when some parts of the door were degreased and sanded properly and other parts weren't. It can also happen if spot patches were primed but the surrounding film wasn't feathered well. The fix is usually a uniform sand and a full, even recoat across the face.
Which problems are fixable and which mean starting again
Some defects are local. Others mean the whole door needs to be reset.
| Problem | Likely cause | Usually fixable | Best remedy |
|---|---|---|---|
| Light brush texture | Poor levelling or overworking | Yes | Light sand and one controlled finish coat |
| Single sag or drip | Overloaded section | Yes | Let harden, sand flat, repaint area or full face |
| Peeling at handle area | Contamination or poor adhesion | Sometimes | Scrape loose paint, sand, clean, spot prime, repaint |
| Sticky edges | Door closed too early or paint too heavy on edges | Sometimes | Allow more cure time, sand edge if binding persists |
| Widespread poor adhesion | Surface not prepared properly | Often no | Strip back unstable areas and restart properly |
Australian guidance also stresses that if a door is painted flat on trestles, one side should dry fully, often overnight, before flipping. That is exactly the kind of discipline that prevents imprinting and surface damage in the first place.
Multiple thin coats beat one heavy coat nearly every time on a door.
One more mistake is using ordinary wall paint because it's already in the garage. Doors get touched, knocked, cleaned, and viewed under raking light. Specialist trim and door coatings are better suited to that kind of wear.
When to Hire a Professional Painter in Melbourne
A single bedroom door in a spare room is one thing. A full set of doors in a lived-in home is something else entirely. The more doors you add, the more the job becomes about workflow, drying space, dust control, and reassembly rather than just painting.
That shift matters in Melbourne homes. Older properties often have movement, layered old coatings, non-standard clearances, and profiles that punish heavy application. Apartments add another layer of difficulty because access, ventilation, odour, and disruption become part of the project.
Jobs that usually justify professional help
Some situations are still reasonable for DIY. Others usually aren't worth the hassle unless you already have the tools and enough protected space.
Professional help is usually the smarter option when you have:
- A full house of doors to repaint. Sequencing matters if rooms still need to function.
- An occupied apartment or unit. Australian commentary notes that this is an underserved topic, even though apartment living is significant nationally, with about 16% of occupied private dwellings recorded as flats, apartments, or units in the 2021 Census, and apartment living is more concentrated in Greater Melbourne than the national average (apartment repainting context).
- A pre-sale deadline. Speed matters, but finish quality matters more.
- Heritage or older timber doors. These often need more repair, finer prep, and better judgement around what to paint and what not to overload.
- Existing damage around edges, hinges, or latch zones. These are the areas where a rough job starts sticking.
There is also the basic issue of time. Repainting interior doors properly means removing or masking hardware, cleaning, filling, sanding, priming where needed, applying controlled coats, waiting for cure, then rehanging without damage. That can consume much more of a week than most owners expect.
Where professional standards make the biggest difference
Pre-sale work is the clearest example. Australian real-estate commentary reports that interior repainting can increase sale price by 1% to 3%, and industry polling cited by the Real Estate Institute of Australia notes that 3 out of 4 agents say repainting the interior can add the most value before sale, with some saying it can lift listing value by as much as 10%, or up to $20,000 (Australian pre-sale repainting figures). Doors matter in that context because they sit in hallways, bedrooms, bathrooms, and entry points where buyers naturally look.
A professional team also makes sense where consistency matters more than the first coat. That includes matching sheen across multiple doors, keeping hinge mortises clear, controlling dust in occupied spaces, and getting doors back into service without sticky edges or chipped fresh paint.
There is another decision point that often gets overlooked. In investor-grade and pre-sale properties, owners often weigh repainting against replacement. That question is underserved in most generic DIY advice, especially in Australia, where labour and building inputs remain high and visible mistakes on doors are hard to hide. Repainting can be the better value move, but only when prep, adhesion, and sheen selection are done well enough to avoid an obviously patched result.
If the finish needs to look clean under inspection lighting, if the property is occupied, or if you need multiple doors completed on a reliable schedule, professional painting usually costs less frustration than trying to patch a rushed DIY outcome.
If you're weighing repainting interior doors as part of a larger refresh, pre-sale update, or apartment repaint, Newline Painting can help you compare the practical options. You can request a free on-site quote, get advice on paint systems and sheen levels, and work from a clear written scope that covers preparation, coatings, timing, tidy site protection, and final handover.