
If you're looking at tired door frames in a Melbourne home right now, you're probably seeing the same pattern we do on site. Scuffing at knee height, chipped corners near the latch side, old enamel that has yellowed, and brush marks from a rushed repaint that looked acceptable for a month and then started showing every shortcut.
Door frames are small surfaces, but they're unforgiving. They sit at eye level, they catch side light, and they take constant contact. In a South Yarra apartment, that usually means fine impact marks and greasy hand traffic. In an older Kew or Hawthorn home, it often means layers of older coatings over timber that has moved, dried, and picked up dents over time.
A clean result comes from system and restraint, not from slapping on more paint. The frames need proper cleaning, controlled sanding, the right primer for the substrate, and thin, deliberate coats applied in the correct order. That's the standard our team uses on interior trim work across Melbourne, and it's the difference between a job that looks newly painted and one that looks properly finished.
Table of Contents
- Starting Your Door Frame Painting Project
- Choosing the Right Tools and Paint
- Mastering Surface Preparation for Any Frame Type
- Why Priming and Undercoating Are Non-Negotiable
- Applying Paint With Professional Technique
- Common Problems and When to Hire a Professional
Starting Your Door Frame Painting Project
The right way to paint a door frame starts before the tin is opened. You need to decide what you're painting, what condition it's in, and how visible the finish will be once the room is back in use.
In Melbourne homes, door frames are rarely identical from one room to the next. A Federation home in Camberwell may have older timber jambs with previous enamel layers and minor movement at the joints. A newer apartment in Richmond may have smoother, factory-primed trim or low-maintenance materials that need a different prep approach. If you treat every frame the same, the result will vary room to room.
The first practical decision is scope. Are you repainting only the frame, or the full trim package including architraves, skirts, and the door itself. In most occupied homes, the best visual result comes from treating the frame as part of the surrounding trim, because isolated repainting can make adjacent surfaces look dirtier and older by contrast.
What a professional sequence looks like
A durable finish usually follows this order:
- Inspect the substrate and identify timber, metal, or PVC.
- Protect nearby surfaces with tape and drop sheets.
- Clean and de-gloss so the coating has something to bond to.
- Fill and sand any chips, dents, or rough repairs.
- Prime where needed rather than assuming the existing surface is stable.
- Apply controlled finish coats in a consistent order.
Practical rule: Door frames reward patience. Most defects people blame on paint are actually prep defects showing through paint.
Trade experience matters. Newline Painting has completed 500+ projects across Melbourne, and the same pattern holds every time. If the frame is prepared properly, the topcoats behave. If the prep is rushed, even premium paint won't hide poor sanding, dirty edges, or unstable old enamel.
For informed clients, that's usually the core question. Not “what colour should we use?” but “what system will stop this frame from looking tired again too quickly?”
Choosing the Right Tools and Paint
A door frame in a Brighton townhouse and a frame in a Victorian terrace in Carlton should not be painted with the same kit or coating system. The shapes may look similar. The substrates, old coatings, and finish expectations are often completely different.
Good results start with control. On frames, that means a brush that holds a clean edge, tape that releases without tearing fresh paint, and a coating that matches the material underneath. At Newline Painting, this is usually where a job either stays tidy and sharp or starts showing brush drag, fat corners, and premature wear within months.
Tools that improve the finish
For most interior timber frames, use a quality angled sash brush in the 38mm to 50mm range. That size gives enough paint carry to keep a wet edge, but still lets you cut the inside line cleanly where the jamb meets the wall. Cheap flat brushes tend to splay under pressure. That is when corners flood and brush marks stay visible after drying.
The rest of the kit should be chosen for the frame, not grabbed from a generic DIY shelf list:
- Angled sash brush for cutting along jambs, heads, and tight internal corners
- Mini microfiber roller for flatter, wider sections if you want to reduce brush texture on modern trim
- Low-tack painter's tape for adjacent walls or delicate existing finishes
- Canvas or absorbent drop sheets for occupied homes with timber floors or carpet
- Fine abrasive paper or sanding sponge for controlled de-glossing between coats
- Filling knife sized to the defects, not oversized for small trim repairs
- Tack cloth or microfiber cloths for final dust removal before coating
One trade detail that makes a visible difference is brush loading. Load only the lower section of the bristles, then work the paint into the brush rather than carrying a heavy blob to the frame. That gives cleaner control on the door stop and the inner rebate, where excess paint tends to pool.
If the frame sits against walls that also need work, proper prep across both surfaces matters. Our guide to preparing walls for painting properly covers the wider setup that helps trim lines stay crisp.
Picking a paint system that suits the frame
For most Melbourne interiors, premium water-based enamel is the best fit. It dries harder than standard wall paint, washes well, and is easier to use in occupied homes where smell and downtime matter. I usually specify satin or semi-gloss depending on the age of the house, the profile of the trim, and how much surface movement or past repair work is present.
Semi-gloss suits detailed period trim because it throws a sharper line across the moulding. In suburbs such as Hawthorn, Canterbury, or Malvern, that extra reflectivity often helps heritage architraves and frame profiles read properly. Satin is more forgiving on newer builds and apartments. Under LED downlights, it shows fewer surface imperfections and gives a softer finish.
Oil-based enamel still has a place on selected jobs, especially where clients want a traditional harder shell on older timber trim. The trade-off is slower curing, stronger odour, yellowing risk in low-light areas, and a narrower application window if you want the finish to level well.
| Sheen | Appearance | Wear resistance | Best For |
|---|---|---|---|
| Satin | Low lustre, softer look | Good for standard internal use | Modern homes, apartments, frames with minor surface variation |
| Semi-gloss | Cleaner highlight, more reflective | Better for frequent contact | Hallways, family homes, period trim |
| Gloss | High reflectivity | Hard-wearing, but unforgiving | Select heritage details with near-perfect prep |
Material drives the system as well. Old Melbourne timber frames often need a different coating approach from newer MDF trim, aluminium-clad sections, or PVC surrounds used in renovated extensions. PVC and factory-finished materials can reject paint if the wrong primer and topcoat are used. Steel components can telegraph scratches and edge corrosion if they are treated like timber. If you are comparing adjacent door substrates before specifying coatings, this guide on choosing commercial door materials is useful context because the base material affects adhesion, movement, and long-term finish behaviour.
One final point. Do not buy paint by colour card alone. On door frames, the right product is the one that levels cleanly, resists hand marks, and stays bonded on the specific material already in your home.
Mastering Surface Preparation for Any Frame Type
A door frame can look fine at first glance and still be set up to fail. In Melbourne homes, I see it all the time. Fresh paint over hand oils near the latch side, gloss left unsanded on the head, filler sitting proud under a white topcoat. The finish goes on, then the defects show up as soon as the light hits from the hallway window.
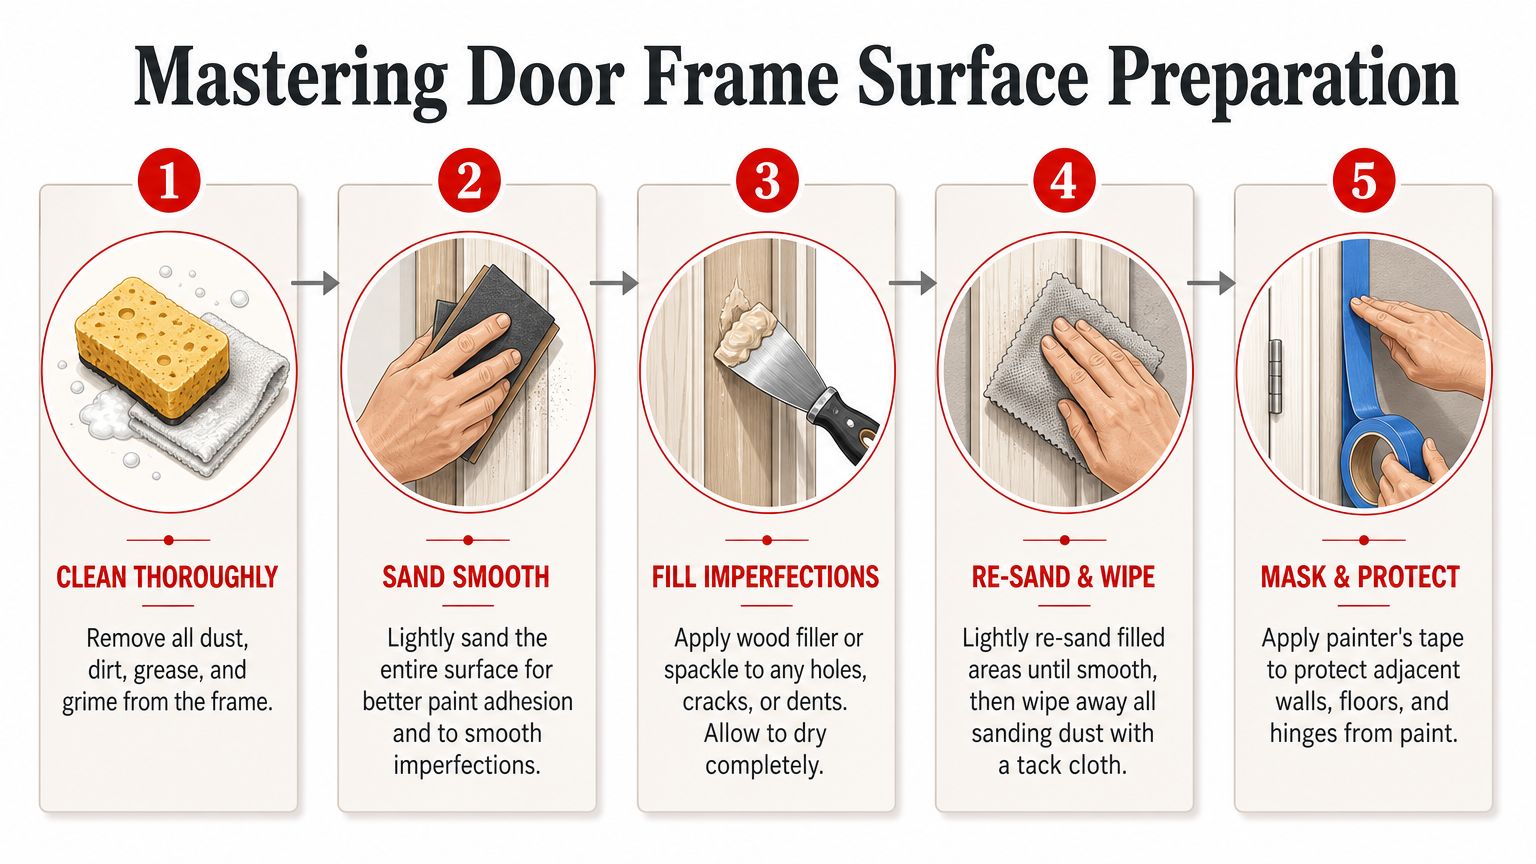
Good preparation gets the surface clean, stable, and evenly abraded before any coating starts. That means removing grease and dust, dulling the old finish so the next coat can grip, repairing damage properly, and protecting adjacent surfaces before sanding and painting. None of that is optional if you want a finish that levels well and stays put.
Timber frames in Melbourne period homes
Older timber frames need the most judgement. In suburbs like Kew, Albert Park, and Northcote, many door frames have layers of old enamel, minor joint movement at the mitres, and patch repairs from years of knocks and rehanging.
On previously painted timber, the sequence is straightforward, but the standard matters:
- Wash the frame with sugar soap or a suitable cleaner to remove skin oils, grime, and residue.
- Sand the existing coating enough to remove gloss and feather rough edges.
- Fill dents, chips, and open joints with the right filler for the defect, not one filler for everything.
- Sand repairs flush so they disappear under reflected light, not just from straight on.
- Vacuum and wipe down dust before any primer or undercoat touches the frame.
The trade-off is time. Quick prep can make a frame look acceptable on the day. Careful prep gives you clean lines, a flatter finish, and far less risk of peeling around handles, strike plates, and high-touch edges.
Bare or stained timber needs extra care because the problem is not just texture. Old hardwood can bleed through pale paint systems, and porous patches can dry at a different rate from surrounding painted areas. That is why professional prep is less about following a generic checklist and more about reading the frame in front of you.
Older timber usually shows every shortcut. Glossy islands point to missed sanding. Fine ridges around repairs show the filler was never feathered properly. Yellow or brown shadowing under white paint points to contamination or timber bleed that was left in the system.
If you want a broader maintenance view for exterior and exposed timber surrounds, this homeowner's guide to door frame maintenance is worth reading alongside painting advice, because movement, damage, and moisture entry often start before the coating fails visibly.
For adjacent prep principles on surrounding plaster and internal surfaces, our guide to how to prepare walls for painting follows the same trade logic.
Metal frames in apartments and utility areas
Metal frames show up more often in apartment corridors, laundries, garages, and service areas. They need a different approach from timber because the substrate does not forgive heavy-handed prep.
The aim is to clean the surface thoroughly, remove any loose or failing material, and create a light mechanical key without cutting deep scratches into the frame. Over-sanding sound coatings can leave visible scoring under the finish. Under-preparing slick factory-coated sections often leads to adhesion failure at corners and contact points.
Check edges, hinges, and strike areas closely. If corrosion has started, deal with that before paint goes on. A neat topcoat over active rust might look presentable for a while, but it will usually fail from that damaged point first.
PVC and low-maintenance modern frames
PVC and other low-maintenance frame materials are common in newer renovations and townhouse builds across Melbourne's outer suburbs. They are stable and tidy, but they catch out plenty of DIY jobs because the surface is too slick for casual prep.
Clean first. Then scuff the surface lightly and evenly. The goal is to reduce surface slickness without gouging or distorting the material. Aggressive sanding, scraping, or loading on thick coats usually creates more problems than it solves, especially on bright white trim where every drag mark shows.
This is one of the clearest differences between heritage timber and modern PVC. Timber usually needs defect correction and absorbency control. PVC needs adhesion control. If you prep both the same way, one of them will let you down.
A flawless door frame finish usually starts with patient prep, not faster painting. When the surface has been cleaned properly, sanded evenly, and repaired with care, the coating stage becomes far more predictable.
Why Priming and Undercoating Are Non-Negotiable
Primer isn't just a first coat. It solves substrate problems that finish paint can't.
What primer is actually doing
On door frames, primer usually handles one or more of these jobs:
- Adhesion on old glossy coatings or slick surfaces.
- Sealing on porous or repaired areas so topcoats dry evenly.
- Stain blocking where water marks, smoke residue, or timber bleed are present.
- Levelling absorbency between bare patches, filler, and old paint.
Without that step, the topcoat often flashes, grips unevenly, or shows patchiness even if the colour looks right from a distance.
This is especially important when a client wants dark stained timber painted white. The colour change gets all the attention, but the primary issue is substrate behaviour. If the old surface isn't isolated properly, the clean new white finish can start showing contamination or uneven sheen.
Matching the primer to the problem
The right primer depends on what's under it. Bare timber needs a different system from glossy old enamel. Water-damaged sections need a stain-blocking primer, not just another acrylic coat. Metal needs a compatible primer that addresses adhesion and protection at the same time.
In practice, we choose the undercoat based on risk. If there's tannin bleed, we use a stain-blocking approach. If there's slick old trim enamel, we use a bonding system after proper sanding. If there are filler-heavy repairs, we use an undercoat that evens out the porosity so the topcoat doesn't sink into patched areas.
Trade note: Primer is cheaper than rework. If the substrate is questionable, the undercoat is where you buy reliability.
For readers weighing paint systems in more detail, our article on what primer paint does and when to use it breaks down the role of primer across different surfaces and repaint scenarios.
Applying Paint With Professional Technique
Application is where the finish becomes visible. It's also where rushed brushwork undoes careful preparation.

The professional approach is controlled and geometric. One established rule for painting door frames is to paint the inside corner first, then work the jambs with long up-and-down strokes, and finish across the top of the frame with overlaps of at least half an inch, then apply a second coat once the first is dry to the touch and remove masking tape before the paint fully cures to protect the edge line, as outlined in this door frame painting sequence guide.
The brush sequence that keeps lines clean
That order matters because it follows the frame's shape and helps maintain a wet edge. If you jump around randomly, one section starts setting while you're dragging fresh paint into it from another angle. That's how lap marks and drag lines appear.
A good working method looks like this:
- Load the brush lightly. Don't bury the bristles. Controlled paint beats excess paint every time.
- Start in the inside corner. That's where blobs and drags show first if the brush is overloaded.
- Run the jambs in long strokes. Short choppy strokes leave texture and visible starts and stops.
- Finish the head of the frame last. Keep overlaps neat and feathered.
- Let the coat dry properly. Then inspect, denib lightly if needed, and apply the next coat.
What doesn't work is trying to get full opacity in one heavy pass. Thick coats sag at the lower sections, pool in profile edges, and cure poorly. Thin coats are slower in the moment and better in the result.
For adjacent trim work, especially when frame and leaf are being refinished together, our guide to repainting interior doors covers the coordination between the two surfaces.
Here's a practical visual walkthrough of the process in action:
Brush versus spray on door frames
Clients often ask whether spraying is better. Sometimes it is, but not automatically.
Brush application is still the right choice for many occupied homes because it gives precise control, limits overspray risk, and suits in-situ trim where walls, floors, and furniture are already finished. Spraying can produce a very refined look, but only when masking, room setup, product choice, and environmental control are handled properly.
That's the same judgement call painters make on other profile-heavy surfaces. If you're interested in how application method changes on different substrates, this article on painting fiber cement siding is a useful comparison because it shows how coating approach shifts once substrate texture, exposure, and scale change.
In a lived-in Melbourne home, the best technique is the one that matches the room conditions, the substrate, and the standard of finish expected after the tape comes off.
Common Problems and When to Hire a Professional
Most door frame problems come down to prep, product mismatch, or over-application. The good news is that some are repairable. The bad news is that a few indicate a bigger issue than paint alone.
Problems that can still be fixed
Brush marks, drips, and patchy coverage are usually recoverable. If the coating is sound, the fix is often to let it dry, sand back the defect, remove dust properly, and recoat with a thinner, more even application.
Typical causes include:
- Visible brush lines from overworking paint as it starts to tack off.
- Runs and sags from loading the brush too heavily.
- Poor coverage from trying to stretch one coat too far.
- Ragged edges from leaving tape on until the paint has cured too hard.

Some defects are cosmetic. Some aren't. Peeling, persistent cracking, or old coatings breaking away from the substrate often mean there's an adhesion or moisture issue underneath.
When professional help is the sensible option
If you're dealing with a heritage property in suburbs like Malvern or Albert Park, the risks go beyond brush technique. Older coatings can be unstable, timber may need repair before painting, and colour matching new trim work to existing period detail takes judgment, not just product.
Professional help also makes sense when the finish has a commercial consequence. Pre-sale work for a campaign managed by agencies such as Jellis Craig, Marshall White, or Ray White needs to look sharp under inspection lighting and photography. Small trim defects stand out quickly once the walls, floors, and styling are cleaned up.
That's where process matters. Newline Painting works from a written quote, clear prep standard, and paint system selection matched to the substrate. Our trade-qualified painters work across Melbourne with $20M public liability insurance and a 7-year workmanship warranty, which matters when the expectation is not just a fresh coat, but a finish that holds up.
If your door frames need more than a quick touch-up, Newline Painting can inspect the substrate, specify the right paint system, and provide a free on-site quote across Melbourne. If you'd rather talk it through first, call 1300 044 206.