
You're usually reading about painting house exterior at one of two moments. The first is when you step back from the kerb and notice the chalking, peeling trim, hairline cracks in caulking, or a weatherboard elevation that looks tired no matter how clean it is. The second is when you're getting a property ready for sale and the outside of the house suddenly matters as much as the inside.
In Melbourne, an exterior repaint isn't just cosmetic. It's maintenance, protection, and presentation rolled into one. That matters whether you own a weatherboard in Hawthorn, a Federation home in Kew, a rendered townhouse in South Yarra, or a bayside property dealing with more salt and exposure. If you're also thinking about the whole frontage, these curb appeal landscaping ideas pair well with a repaint because the front garden and façade always read together.
Table of Contents
- A Professional Approach to Exterior Painting in Melbourne
- Planning and Timing Your Exterior Project for Melbourne's Weather
- The Critical Preparation Phase The Secret to a Durable Finish
- Selecting the Right Primer Paint and Sheen
- Professional Application Techniques and Safety
- DIY vs Hiring a Professional Painter in Melbourne
- Warranty Aftercare and Long-Term Maintenance
A Professional Approach to Exterior Painting in Melbourne
A proper exterior repaint starts with the building, not the paint tin. The age of the house, the substrate, the amount of sun each elevation gets, and how much moisture the exterior holds all shape the method.
Melbourne homes make that obvious very quickly. A Victorian terrace with detailed timber trims asks for a different approach from a newer rendered façade in Armadale. Weatherboards move, old putties fail, end grain absorbs moisture, and west-facing walls cop more heat than sheltered sides.
That's why the job has to be approached as a system. Surface condition, repairs, primer, topcoats, weather window, and application technique all need to line up. If one of those parts is wrong, the rest of the job carries the weakness.
Practical rule: Exterior paint fails from underneath more often than from above. Loose coatings, moisture, failed joints, and bad adhesion cause more trouble than colour choice ever will.
At Newline Painting, the process starts with a written quote that spells out scope, preparation, paint system and sequence, so the owner knows what's being allowed for. That matters on Melbourne homes because two houses that look similar from the street can need very different amounts of scraping, filling, caulking, sanding, timber repair, or stain-blocking once you inspect them properly.
A quality contractor should also be clear about what they're protecting and what they're not. Fascias, eaves, windows, gables, heritage trims, downpipes, fencing, rendered plinths, and detached garages all sit in different condition categories on real sites. If the quote is vague, the job usually is too.
Planning and Timing Your Exterior Project for Melbourne's Weather
The best time to paint outside in Melbourne is when you can control temperature, surface dryness, and cure time. That sounds simple, but it's where many exterior jobs come unstuck.
Most exterior paint systems in Australia are designed to last 7–10 years, but Melbourne's variable weather, coastal exposure, and harsh sun can shorten that to around 5–7 years, especially on timber surfaces that often need attention sooner, according to this exterior repainting guidance. That tells you two things straight away. First, timing matters. Second, exposure matters just as much as workmanship.
What timing really controls
The calendar matters less than the daily conditions. A mild run of days with stable temperatures is more useful than a nominal “good season” full of showers, dew, and sudden heat.
For most Melbourne exteriors, these are the variables worth watching:
- Surface temperature: A wall in direct afternoon sun can be far hotter than the air around it.
- Moisture in the substrate: Timber, render and masonry all hold water differently after rain or washing.
- Shade movement: You can often keep production moving by following the shaded side of the house.
- Wind exposure: Wind dries surfaces fast, but it can also affect application and leave debris in wet paint.
A bayside house in Brighton or St Kilda often behaves differently from a sheltered property further inland. Salt air, open exposure, and stronger weathering usually show up first on sills, trims, weatherboard joints, and the most exposed elevations.
How pros schedule around Melbourne conditions
Professional scheduling is about sequencing the work so the substrate is ready when the weather is. Washing, drying, repairs, priming, and topcoats don't all happen on the same rhythm.
A practical schedule usually looks something like this:
-
Inspection first
Identify failed areas, open joints, soft timber, chalking, old peeling coatings, and any surfaces likely to need special primers. -
Prep before the best weather window
Washing, scraping, sanding and filling can often start before the perfect paint days arrive. -
Prime exposed areas as they're stabilised
Bare timber and vulnerable patches shouldn't sit open longer than necessary. -
Apply finish coats when the house, not just the forecast, is ready
The substrate has to be dry, stable and cool enough for the coating to level properly.
Good exterior scheduling isn't about speed. It's about not forcing a coat onto a surface that isn't ready to receive it.
Project scope changes timing too. A straightforward repaint on a compact weatherboard can move very differently from a heritage home with detailed fretwork, sash windows, decorative brackets and multiple colour breaks. The more cutting in, trim detail and repair work involved, the more important daily weather management becomes.
The Critical Preparation Phase The Secret to a Durable Finish
Preparation is where the lifespan is won or lost. If the surface isn't stable, clean and dry, the finish coats are only dressing up a problem.
Australian industry guidance puts the highest value on substrate and weather control, with the sequence being wash off contaminants, scrape all loose paint, fill defects, then prime bare areas. That same guidance also stresses letting surfaces dry for about 24 to 48 hours after washing and applying exterior coatings when temperatures are roughly between 10°C and 30°C, as outlined in this exterior painting preparation reference.
Preparation decides the lifespan
On older Melbourne homes, prep usually takes longer than owners expect. That's normal. A weatherboard in Brighton with peeling south-side boards and sun-baked west-facing trims can need a very different level of stabilisation across one façade alone.
Loose paint has to come off. Chalking has to be removed. Cracks and failed caulking need to be opened, cleaned and filled properly. If you coat over any of that, the new film is bonded to failure.

The prep sequence we don't skip
Every substrate has its quirks, but the backbone of the process stays consistent.
-
Wash the exterior properly
Dirt, pollution, cobwebs, mould and chalky residue all interfere with adhesion. A surface can look clean and still be unpaintable if there's powdery breakdown left behind. -
Scrape back all failed material
We don't “spot over” flaking paint and hope for the best. Anything loose, lifting or hollow-sounding has to be removed to a sound edge. -
Sand feathered edges smooth
This matters for both adhesion and appearance. Without sanding, patched areas print through the finish and you end up with visible ridges around every repair. -
Fill defects and repair gaps
Exterior fillers, sealants and caulks each have their place. Shrinkage cracks, open mitres, minor timber defects and failed joints need the right product, not whatever is on hand. -
Prime bare and vulnerable areas
Primer seals porosity, improves adhesion, and helps even out suction between old coatings and exposed substrate.
A lot of owners want to talk colour first. On site, the condition of the surface usually matters more.
If the prep hasn't dealt with moisture entry points, the nicest colour scheme in Melbourne won't stop peeling around windows, sill ends, or weatherboard laps.
For owners comparing systems, our paint and primer guide for Melbourne projects is useful because it breaks down when a standard undercoat is enough and when the substrate needs something more specialised.
What cheap exterior quotes usually miss
Cheap quotes often reduce labour by reducing prep. That usually shows up in a few predictable ways:
- Minimal scraping: Only the worst flakes are removed.
- No real sanding: Edges are left rough and telegraph through the finish.
- Patchy priming: Bare timber gets missed or only lightly touched.
- Rushed drying: Surfaces are recoated before they've properly dried out.
- Cosmetic filling only: Movement joints and failed caulking are left as-is.
On period homes, especially around heritage trims, decorative mouldings and old windows, those shortcuts show up fast. The finish looks acceptable on handover day, then starts failing first on the edges, junctions and repaired spots.
Selecting the Right Primer Paint and Sheen
The right product system depends on the substrate, its condition, and the exposure it has to live with. Exterior painting isn't one product. It's a chain of compatible coats doing different jobs.
That's become more important as conditions get harsher. Australia has warmed by about 1.5°C since 1910, and that shifts the conversation from “how do I paint?” to “which coating system will tolerate hotter UV, more movement, and stronger weathering?”, as noted in this climate and exterior paint discussion.
A paint system is more than a colour
Primer selection should follow the problem you're solving.
On exteriors, that often means:
- Bare timber primers for exposed boards, trims, fascias and repaired sections.
- Stain-blocking primers where tannin bleed, water marks or old staining are likely to come through.
- Masonry or sealer-style primers for porous brick, render or patch-repaired areas.
- Adhesion-focused primers where the old coating is weathered but still basically sound after preparation.
Topcoat choice then needs to match the surface profile and the look you want. On Melbourne homes, acrylic exterior systems are common because they cope with movement better than brittle films on weatherboards, eaves and trim junctions. We commonly work with brands such as Dulux, Haymes, Taubmans, Berger and Wattyl, but the exact system should be selected after looking at the existing coating and substrate condition.
Sheen is where many owners make a decision based only on appearance. That's a mistake. Sheen affects visibility of surface defects, washability, and how hard the façade reads in changing light.
Exterior Paint Sheen Comparison
| Sheen | Appearance | Best For | Pros | Cons |
|---|---|---|---|---|
| Low sheen | Soft, muted finish | Weatherboards, broad wall areas, render | Hides minor surface variation better, reads less harshly in strong light | Doesn't highlight trim detail as sharply |
| Semi-gloss | Noticeably crisp with some reflectivity | Trims, fascias, doors, window frames | More durable feel on detailed elements, easier to wipe down | Shows prep defects more clearly |
| Gloss | High reflectivity | Feature trims, select heritage details, front doors | Sharp visual definition, suits some period detailing | Highlights imperfections and brush marks if prep is poor |
For a closer breakdown of how different finishes behave on painted surfaces, this guide to paint finishes and sheen levels is worth reviewing before you lock in product selections.
Colour choice has to suit the house and the light
Exterior colours always read against roof colour, paving, neighbouring homes, garden mass, and Melbourne light. A Federation façade in Camberwell can carry a more traditional trim hierarchy than a newer townhouse in Richmond, but the common mistake is still the same. People choose from a swatch indoors and judge too early.
If you're narrowing options, these curated ideas for exterior painting colours are useful for seeing how schemes sit on actual façades rather than in a fan deck.
Dark trims and deep body colours can look excellent, but they're less forgiving on broad elevations that cop hard western sun. They need better prep and cleaner application to read well.
Professional Application Techniques and Safety
Application quality comes from control. The painter has to control film build, edge quality, overlap, weather, and sequence across the house.
Trade guidance consistently warns against painting in direct sun or on hot substrates because it can cause lap marks. The better method is to work in shade, start at the top, and keep a wet edge, especially on rendered and timber exteriors where failure often appears first at joints and trim, as noted in this exterior application guide.
Application method affects finish quality
A good exterior sequence usually starts high and works down. Eaves, fascias, gutters, upper weatherboards or wall fields, then windows, trims, and lower sections. That limits drips onto finished work and keeps the site more organised.
The main techniques that separate a durable finish from an average one are simple, but they require discipline:
-
Maintain a wet edge
Stop-start painting on large wall runs creates lap marks and uneven texture, especially on warm days. -
Cut in to a standard, not just to a line
Heritage trims, window reveals and decorative mouldings need consistent brush control or the finish looks ragged even with good paint. -
Apply full coats, not stretched coats
Two proper finish coats matter because the coating needs enough film build to perform as designed. -
Follow the sun around the house
West-facing walls and dark surfaces can heat up quickly. Good painters shift elevations rather than forcing the work.
A lot of owners notice the final colour. Painters notice the joins, the edge definition around windows, and whether one elevation reads uniform from end to end.
Here's a useful visual reference on brush control and edge work:
Safety changes the way pros work
Exterior painting on a single-storey weatherboard and exterior painting on a tall period house are different safety jobs. Ladder setup, scaffold access, fall risk, powerline awareness, and public protection all affect the method and the timing.
Older Melbourne homes also raise another practical issue. Previous coatings may include lead-based paint layers. If a house has age and history on its side, sanding and removal methods need to be handled cautiously and assessed on site before aggressive prep starts.
Site protection matters too. Windows, paving, plantings, light fittings and hardware all need masking and covering. If paint does end up on glass, this guide to professional paint removal from windows explains why scraping glass casually can do more harm than good.
DIY vs Hiring a Professional Painter in Melbourne
The honest answer is that DIY can work on the right project. It becomes far less attractive once the house is tall, detailed, weathered, or difficult to access.
Across Australian real estate, pre-sale improvements that lift street appeal are consistently linked to higher buyer interest, with exterior painting often cited as one of the highest-return cosmetic upgrades for first impressions, according to this discussion of exterior painting and property value. That means the decision isn't only about labour cost. It's also about the standard of finish the market will see.
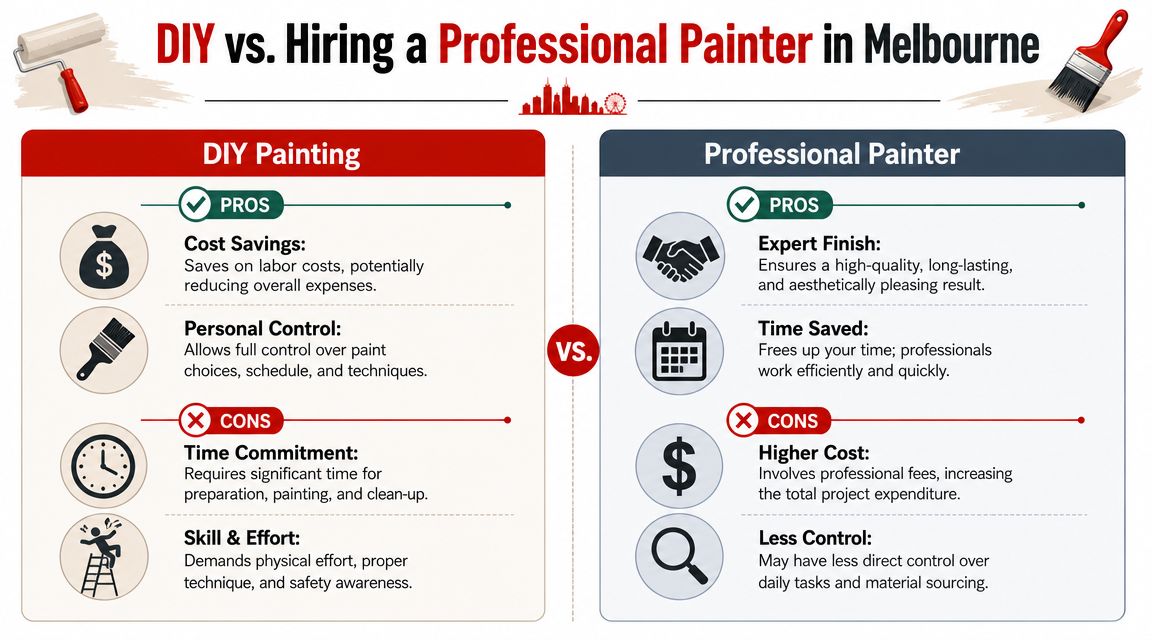
Where DIY makes sense
DIY is more realistic when the scope is limited, the access is straightforward, and the surface condition is already stable.
That usually means jobs like:
- Small detached elements such as a low fence or a simple outbuilding.
- Minor touch-up work where the original system is known and the coating is otherwise sound.
- Single-elevation repainting on accessible areas with minimal trim detail.
DIY becomes harder when the work includes weathered timber, old flaky coatings, heritage detailing, high gables, or multiple substrates on one façade. The labour is heavier than often anticipated, and the preparation standard has to stay high even when the job gets repetitive.
The real DIY trap isn't painting. It's underestimating how much scraping, sanding, filling, masking and ladder work sits before the first finish coat goes on.
What a professional quote should tell you
A proper quote should identify the scope clearly enough that you can compare one contractor with another. If it just says “paint exterior house”, it hasn't told you much.
Look for these details:
-
Preparation scope
Washing, scraping, sanding, gap filling, caulking, masking and any allowed timber repairs should be described. -
Paint system
The quote should state the primer and topcoat approach, not just a brand name. -
Coat count
You need to know whether the contractor is allowing spot priming, full priming where needed, and two finish coats. -
Access method
Ladders, scaffold, extension gear or access to high areas affects both safety and production. -
Protection and clean-up
Window masking, plant protection, daily tidy-up and final handover should be part of the process.
If you're comparing local contractors, reviewing what to expect from painters near your Melbourne property can help frame the right questions.
The main value in hiring a professional is control over quality and risk. Newline Painting, for example, completes residential repaints with a trade-qualified team, carries $20M public liability insurance, and backs workmanship with a 7-year warranty. Those details don't replace good prep and application, but they do tell you the contractor is set up to stand behind the work.
Warranty Aftercare and Long-Term Maintenance
A workmanship warranty matters because exterior painting is meant to perform over time, not just look neat at handover. The point of the warranty is accountability for how the job was prepared and applied.
What a workmanship warranty should mean
A good workmanship warranty should reflect confidence in the process. If the contractor has prepared properly, used a suitable system, and applied it to the right conditions, they should be willing to stand behind the work.
For owners, that makes the conversation more specific. Ask what the warranty covers in practical terms, what aftercare is recommended, and how any issue should be reported if something doesn't look right after the project is complete.
The strongest exterior jobs are usually the ones with a clean process from quote to walkthrough. Clear scope, proper prep, full coats, final inspection, and a tidy handover all matter more than sales language.
Simple maintenance that protects the coating
You can extend the life of an exterior repaint with low-effort maintenance.
-
Wash the exterior gently
Soft washing down accumulated dirt, salt, and grime helps the coating stay cleaner and lets you inspect the surface properly. -
Check joints and caulking
Small cracks around trims, windows and penetrations can let moisture in long before paint visibly fails. -
Deal with minor damage early
Chips, split sealant, and exposed timber are easier to repair before weather gets into the substrate. -
Watch the hardest-hit elevations
The sunniest and most exposed sides usually tell you first when maintenance is due.
For most Melbourne homes, exterior paint should be planned as part of the maintenance cycle rather than left until broad failure appears. Once coatings have broken down and substrate repairs start multiplying, the repaint becomes a more involved job.
If you want a detailed assessment of your exterior, request a free on-site quote from Newline Painting or call 1300 044 206. A clear quote should tell you what's being prepared, what system is being applied, and how the job will be staged for Melbourne conditions.