A lot of bathroom tile jobs fail before the first coat goes on. The paint gets blamed, but the actual cause is usually soap residue left in grout lines, a glazed surface that was never properly keyed, or a bathroom that went back into service before the coating had hardened. In Melbourne, that problem shows up all the time in older Victorian and apartment bathrooms where ventilation is poor and moisture hangs around longer than people expect.
Painting tiles can work. It can also peel, mark, or wear early if the process is treated like ordinary wall painting. In wet areas, durability comes from disciplined preparation, the right primer and topcoat system, and patience during cure. That's the difference between a cosmetic quick fix and a finish that holds up under regular use.
Table of Contents
- Is Painting Bathroom Tiles a Good Idea
- Choosing the Right Tile Paint System
- Surface Preparation and Minor Repairs
- Application Techniques for a Flawless Finish
- Drying Curing and Long-Term Care
- When to Hire a Professional Painter
- Get a Professional Quote for Your Bathroom
Is Painting Bathroom Tiles a Good Idea
Yes, painting bathroom tiles can be a good idea if the tiles are sound and the job is approached as a coating system, not a shortcut.
The usual situation is familiar. A homeowner in a South Yarra apartment or a Camberwell Edwardian wants to lift a dated bathroom without opening up the whole room. The tiles are solid, the layout works, and full replacement feels excessive. Painting becomes attractive because it updates the finish without the mess of removal.
That said, tile painting isn't forgiving. Glossy ceramic and porcelain surfaces don't give you much margin for error, especially in wet rooms. If the bathroom already has heavy moisture load, tired grout, or poor airflow, the job has to be assessed properly before anyone reaches for primer.
Painted bathroom tiles hold up when the substrate is stable and the coating is treated like a wet-area system. They fail when people paint over contamination and hope the product will do the prep for them.
The bigger question isn't just whether you can paint tiles. It's whether painting is the right choice compared with resurfacing or replacement in that specific room. If you're weighing those options, these expert bathroom resurfacing insights are useful because they look at the broader decision, not just the application steps.
What painting does well
Painting suits bathrooms where the tiles are dated but still bonded well, the grout can be repaired, and the goal is a cleaner, more current look.
It's particularly practical in investment properties, pre-sale work, and compact bathrooms where demolition would create more disruption than value.
What painting doesn't fix
Painting won't correct failed waterproofing, loose tiles, or ongoing moisture problems. It also won't hide poor prep. In older Melbourne bathrooms, especially those with little natural ventilation, durability depends on whether the room can support a coating finish long term.
Choosing the Right Tile Paint System
A bathroom in an older Melbourne terrace can look straightforward until the coating starts seeing daily steam, cold tile surfaces, and weak extraction. That is where product choice shows up. In these rooms, the paint system has to cope with condensation cycles and frequent cleaning, not just look good for handover.
On glazed ceramic or porcelain, the system matters more than the colour card. A lasting result comes from compatible parts that are designed to work together: cleaner, abrasion, primer where required, and finish coats rated for wet-area conditions. If one part is weak, the failure usually shows up at the edges, in grout lines, or on the coldest walls first.
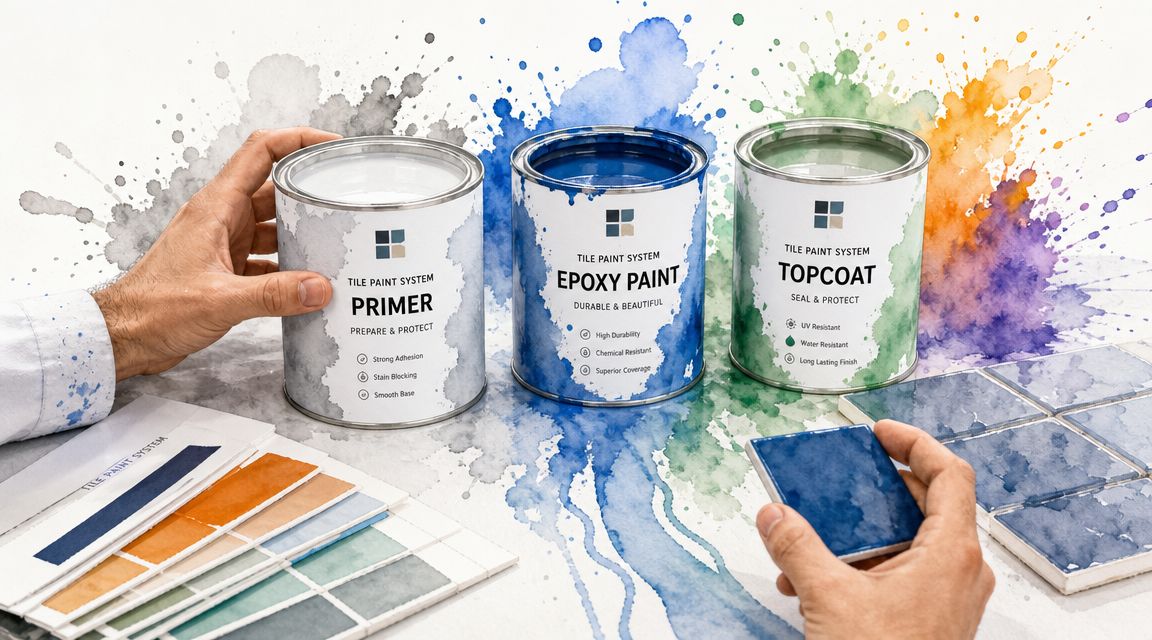
What a proper system includes
A reliable tile paint system usually includes:
- Cleaner and degreaser to remove soap film, body oils, and residue from tile faces and grout
- Abrasive prep to cut the sheen and give the coating a surface profile to bond to
- Bonding primer for glossy, dense, or difficult substrates, especially where adhesion is the main risk
- Two finish coats laid on in controlled, even films so the coating cures properly
Some direct-to-tile products can work on the right job. In practice, I treat them cautiously in bathrooms with poor ventilation or heavy daily use. In Melbourne wet areas, especially older bathrooms that stay damp for hours, a dedicated primer under the topcoat is usually the safer specification.
Choose for exposure, not for convenience
Ordinary wall paint is the wrong system for tiles. The issue is not just moisture. It is repeated expansion and contraction, cleaning chemicals, and water sitting on a hard non-porous surface. A proper wet-area coating system is built to handle that load better.
That is why matching products within one manufacturer's system is usually the lower-risk approach. Primer and topcoat chemistry need to be compatible. Mixing random products because each tin makes a strong claim is where avoidable failures start.
For a broader look at wet-area coating choices beyond tiles, see our guide on what type of paint should you use in your bathroom.
Practical rule: If the product information is vague about glossy tile adhesion, curing time, or wet-area suitability, it is not the right system for a bathroom tile job.
Where systems fail in Melbourne bathrooms
The weak point is rarely the topcoat on its own. Failure usually comes from choosing a system that does not suit the room.
In Victorian and interwar homes around suburbs like Fitzroy, Brunswick, Hawthorn, or Kew, bathrooms often have limited airflow and older layouts that trap steam. In that setting, low-grade coatings soften sooner, mark during cleaning, or lose adhesion around grout joints and corners. A product that performs acceptably on a dry splashback can struggle badly on shower-adjacent wall tiles.
Use the room conditions to guide the system choice:
| Bathroom condition | Better system choice | Common failure point |
|---|---|---|
| Sound glazed wall tiles outside direct shower exposure | Bonding primer plus wet-area topcoat system | Peeling on glossy faces where primer was skipped |
| Older bathroom with poor ventilation and regular condensation | Full manufacturer system with conservative recoat and cure times | Soft finish, edge failure, early blistering |
| Significant colour change, dark to light or patterned to plain | Primer with good holdout, then two finish coats | Patchy coverage and uneven sheen |
| High-contact areas near vanity or towel rail | Harder wearing finish with careful film build | Scuffing and premature wear |
The right system is chosen around the substrate and the room's moisture load. That is the difference between a repaint that holds up and one that starts lifting within a year.
Surface Preparation and Minor Repairs
A bathroom tile job usually fails long before the first topcoat. In Melbourne homes, especially older Victorian and interwar properties with weak exhaust and persistent condensation, the trouble often starts with moisture held in grout, soap residue on glazed faces, or movement around old sealant joints. If those issues stay in place, paint adhesion is already compromised.
Preparation needs to do three jobs. Remove contamination, create a mechanical key on the glaze, and identify defects that paint will not hide. On bathroom tiles, that means more than a quick wash and sand. It means checking whether the surface is fit to coat.
Clean first, then inspect honestly
Start with a full degrease using sugar soap or a suitable degreaser, then rinse properly so no cleaner residue is left behind. In wet areas, contamination is rarely obvious. Hairspray, soap film, body oils, moisturiser, and old silicone smears can all sit on the tile and inside grout lines. A wall can look clean and still reject primer.
After cleaning, inspect the room closely under good light. Look for cracked or missing grout, drummy tiles, swelling in adjacent plaster, failed silicone, chips on tile edges, and dark staining that suggests moisture is getting behind the surface.
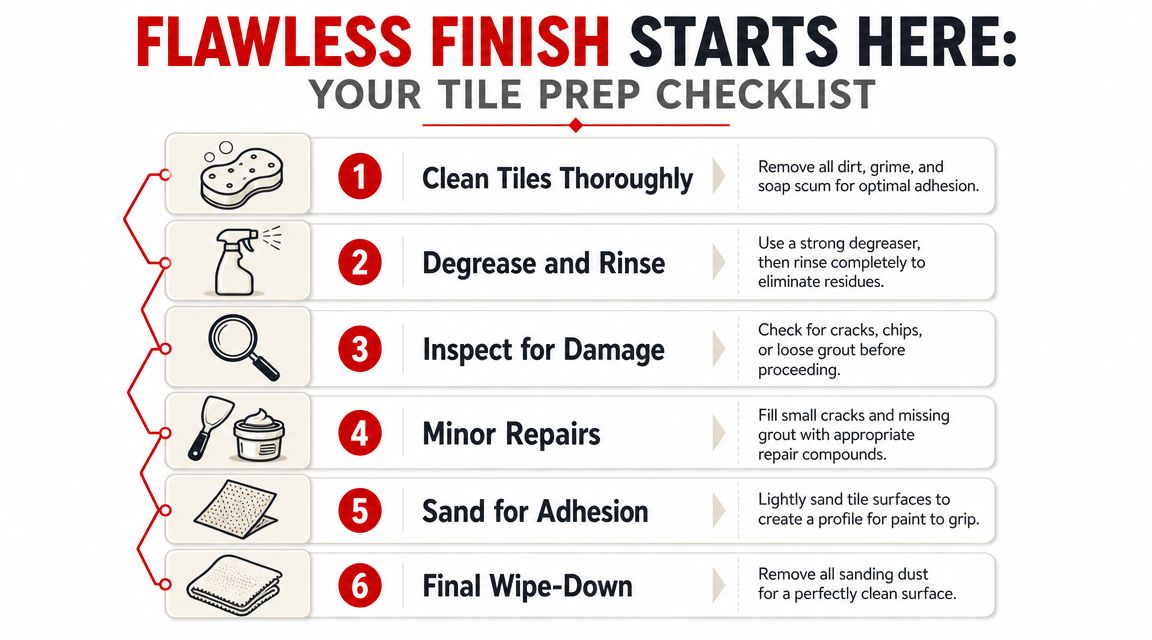
Use this checklist before sanding:
- Wash down all tile faces and grout lines, then rinse off residue
- Check grout condition for cracks, softness, gaps, or mildew staining that keeps returning
- Remove loose material before any filling or patching
- Allow the room to dry fully before abrasion and primer
If grout is breaking down across multiple walls, or tiles sound hollow over a large area, painting is no longer the main repair. The substrate needs fixing first.
Abrasion creates the key
Glossy ceramic tile gives paint very little to grip. The surface has to be dulled evenly so the primer can bond across the whole area, not just in patches. A light, controlled abrasion is the right approach. The aim is to remove the sheen, not carve into the tile.
A practical range is about 100 to 220 grit, depending on how hard and glossy the tile is. What matters more than the exact paper is consistency. Missed shiny spots, especially near edges, corners, and around fittings, are common failure points. In bathrooms with poor ventilation, those same spots also hold more moisture and contamination, which makes the problem worse.
If the tile still reflects light like untouched glaze, keep sanding.
Repair defects before primer
Minor repairs need to be completed before any primer goes on. Small chips, open grout joints, and local surface damage will show through the finish, and reflective coatings make that even more obvious. Paint follows the shape underneath it.
Use repair products that suit wet-area conditions and allow them to dry properly before coating. Flexible joints also need attention. Old silicone around baths, basins, and corners should be removed where it has failed, because paint will not bond to silicone residue for long. At Newline Painting, this is one of the first areas we check in older Melbourne bathrooms, because failed sealant and trapped moisture often sit behind what looks like a simple tile repaint.
For a closer look at how primers are matched to difficult substrates, this paint and primer guide explains the reasoning behind surface-specific preparation.
Prep shortcuts that usually fail
The same mistakes come up again and again:
- Painting over silicone residue near corners, trims, or around a vanity splashback
- Cleaning tile faces but ignoring grout lines, where contamination and moisture sit deeper
- Sanding unevenly, leaving glossy sections beside well-keyed areas
- Priming before the room is fully dry after washing, patching, or recent heavy bathroom use
This part of the job is where professional work earns its keep. In a dry room with sound tiles, preparation is detailed but manageable. In an older Melbourne bathroom with weak ventilation and years of built-up contamination, preparation is the difference between a finish that holds and one that starts peeling at grout lines, corners, and tile edges far too soon.
Application Techniques for a Flawless Finish
A flawless tile finish comes from thin, controlled coats and a strict sequence. Heavy application is what creates lap marks, texture, and weak spots.
Professional guidance for tile coatings recommends 1 to 2 coats of primer followed by 2 finish coats, and one of the key techniques for avoiding roller marks is to keep the roller very lightly loaded, then re-roll with an unloaded roller to level the film, as explained in this professional tile painting method.
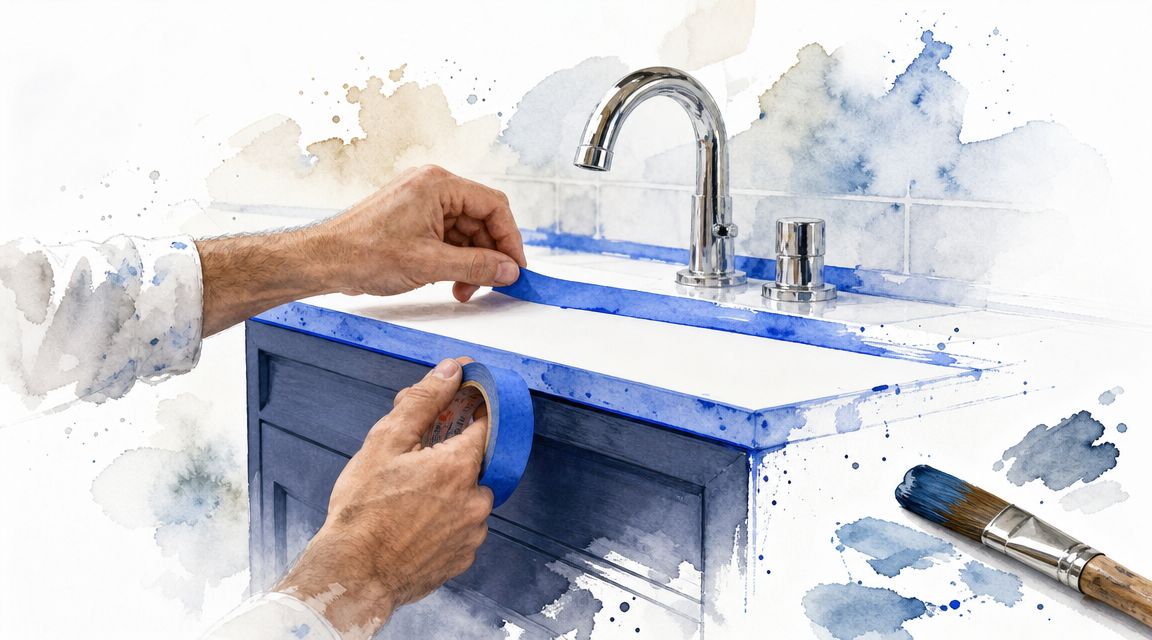
Set the room up properly
Before any coating goes on, mask tapware, fittings, vanity edges, mirrors, and adjacent wall surfaces. On bathroom work, tidy masking matters because the finish is reflective and every cut line is visible.
Ventilation also needs attention. You want moving air without blowing dust across wet paint. In enclosed bathrooms, that usually means controlled airflow through the room rather than aggressive fan use directly onto the surface.
Apply in the right order
The cleanest sequence is straightforward:
- Cut in grout lines and edges first with a small brush.
- Roll the field tiles with a high-density mini roller.
- Keep the film thin so the coating levels rather than builds texture.
- Lay off gently with a near-dry roller pass to even the sheen.
That last step makes a difference on glossy substrates. Bathrooms throw light around. Any heavy roller line or overloaded edge will show once the room is back in use.
Don't chase full opacity in one pass. Tile coatings look better and last better when coverage is built in thin coats.
A short visual demonstration can help if you want to see the rhythm of brush-and-roller work in practice.
Common application mistakes
Most poor finishes come from technique, not intent.
| Mistake | What it causes | Better approach |
|---|---|---|
| Overloading the roller | Drips, stipple, uneven sheen | Use less product and spread it further |
| Ignoring grout lines at the start | Missed recesses and patchy finish | Brush grout and corners first |
| Reworking half-dry areas | Drag marks and patchiness | Work in a controlled sequence and leave it alone |
| Trying to finish in one thick coat | Longer cure stress and weak film | Build coverage gradually |
For property managers and owners who want the work handled as a trade job rather than a trial run, Newline Painting carries out bathroom and tile painting as part of its wet-area coating work in Melbourne.
What a professional finish actually looks like
It should read as even from multiple angles. Not just head-on.
That means consistent sheen across tile faces, clean coverage in grout lines, no heavy edges around fittings, and no obvious roller pattern in reflected light. In a compact bathroom with downlights above the vanity, small application errors become very visible. That's why disciplined technique matters more than speed.
Drying Curing and Long-Term Care
Drying and curing aren't the same thing. A tile surface can feel dry well before it's ready for bathroom moisture.
One tile-paint system specifies application at 10 to 30 °C, becomes touch-dry in 1 hour, can be recoated after 4 hours, and reaches full cure in 7 days, according to this tile paint timing guidance. In a bathroom, that final cure period matters most because the coating has to resist steam, cleaning, and direct moisture.
Why Melbourne conditions matter
Melbourne bathrooms don't cure in laboratory conditions. A cold week, a closed-up terrace bathroom, or a poorly ventilated ensuite can slow everything down. Humidity extends cure time, so treating the touch-dry stage as “finished” is where many jobs get compromised.
If the room is in active use too soon, moisture gets to a film that hasn't fully hardened. That's when you see early marking, soft spots, or adhesion issues around grout and edges.
A painted tile surface might look ready the next day. That doesn't mean the coating is ready for shower steam.
Practical aftercare
Once the coating has cured, maintenance is simple but it needs to be sensible.
- Use non-abrasive cleaners rather than harsh scrubbing products
- Avoid scouring pads on painted tile faces
- Keep ventilation running after showers where possible
- Clean gently at first instead of attacking marks aggressively
Bathrooms in older Melbourne homes often need a bit more patience after completion. If the room has limited airflow, leaving it longer before full service is often the smarter move, even if the product sheet gives a minimum window.
When to Hire a Professional Painter
Hire a professional when the bathroom has real failure risk, not just when you want to save time.
The key decision isn't whether painting is cheaper than replacement in theory. It's whether the room, the tile condition, and the moisture load make success likely. Guidance on painted tiles in humid Australian bathrooms points out that most advice covers the application steps but doesn't deal properly with the practical questions of cost, lifespan, and failure risk, especially in older Melbourne bathrooms with limited ventilation, as discussed in this overview of painting tiles versus replacement.
When DIY usually stops making sense
Some bathrooms are straightforward. Many aren't.
A professional is the safer option when the room has multiple corners and niches, the grout needs selective repair, the tiles are heavily glazed, or the bathroom can't be out of action for a failed first attempt. That comes up often in rental turnovers, pre-sale presentation, and occupied homes where timing matters.
These are the common decision points:
- Complicated layouts where brushwork and cut lines will be highly visible
- High-moisture rooms with poor airflow or frequent shower use
- Visible defects that need repair before coating
- Deadline-driven work where a failed DIY result creates a bigger delay
What you're really paying for
You're paying for risk control. Not just labour.
That includes substrate assessment, the prep standard, product matching, controlled application, and realistic advice if the tiles shouldn't be painted at all. A good painter will tell you when replacement or broader resurfacing is the better path.
For local owners comparing trades, this overview of painters near you in Melbourne helps frame what to ask before booking anyone.
If the bathroom is already difficult to ventilate, the margin for error gets small very quickly.
Accountability matters in wet areas
Bathroom tile painting isn't where you want vague scope or casual prep standards. Wet-area coatings need clear process and clear responsibility.
That's where tangible proof points matter. Newline Painting is Melbourne-based, uses recognised trade paint brands, and backs work with a 7-year workmanship warranty and $20M public liability insurance. On higher-risk bathroom work, that kind of accountability matters more than a cheap starting price because rectifying a failed coating is usually harder than doing it properly the first time.
A professional job is also easier to manage when there's a written quote, a defined prep scope, supervisor sign-off, and a proper handover. That matters to homeowners, but it matters just as much to property managers and agents who need the finish to present well and hold up.
Get a Professional Quote for Your Bathroom
Painting bathroom tiles successfully comes down to substrate condition, preparation quality, product selection, and cure discipline. In a dry room, you can sometimes get away with less. In a Melbourne bathroom, especially an older one with poor ventilation, you usually can't.
If you want a durable finish without guessing through the risk points, get the room assessed properly first. That's the easiest way to decide whether tile painting is the right option and what system the bathroom will support.
If you'd like a detailed on-site assessment, request a free quote from Newline Painting or call 1300 044 206. We service Melbourne homes, apartments, and investment properties, and we'll give you a clear written scope for the bathroom, the preparation required, and the paint system that suits the room.