
You're usually at the same point when this question comes up. The colour is chosen, the room is cleared, and the walls look “good enough” from the doorway. Then a key decision appears: do you paint what's there, or do you prepare it properly so the finish lasts?
For a warrantable result, prep isn't a side task. It's the job underneath the job. On Melbourne projects, especially in older homes around Camberwell, Malvern, Kew and Hawthorn, the wall often tells a different story once you get close: grease near switches, old enamel under newer acrylic, hairline movement in plaster, moisture staining, chalky surfaces, and repairs that were never feathered out properly.
The clients who get the best outcome usually understand one thing early. How to prepare walls for painting isn't about making the wall look busy before paint goes on. It's about giving the coating system a clean, dry, stable surface so it can bond, level out, and hold up over time.
Table of Contents
- The Professional Assessment Before You Begin
- Your Professional-Grade Toolkit and Materials
- A Meticulous Approach to Cleaning and Repairs
- Sanding, Dust Control, and Strategic Priming
- Prepping for Specific Melbourne Wall Conditions
- Final Checks and When to Call a Professional
The Professional Assessment Before You Begin
The right prep starts with diagnosis, not sanding. A professional assessment goes well beyond spotting dents and cracks because the coating already on the wall, the wall substrate itself, and any sign of moisture will decide what happens next.
What we check before any prep starts
On site, the first pass is visual, but the second pass is tactile and deliberate. We check for sheen differences, soft patches, powdery residue, greasy hand marks, failed repairs, previous patching compound, movement around cornices, and staining that may bleed through later.
In Melbourne homes, that matters more than many people expect. A South Yarra apartment wall usually behaves very differently from an older plaster wall in a period home in Camberwell. One may only need localised filling and a light key. The other may need broader stabilising work, careful feather sanding, and a more selective primer choice.
Moisture is one of the first things to rule out. If a wall has active dampness, a recent leak, or trapped moisture from cleaning, painting over it is asking for blistering, staining, or adhesion failure later. Bathrooms, laundries, south-facing rooms, and older ceilings under roof penetrations need extra scrutiny.
Practical rule: if the wall condition doesn't make sense, stop and identify the cause before touching the surface.
How to identify old coatings properly
One of the most commonly missed steps is identifying whether the existing coating is oil-based or water-based. That matters because older enamels, especially on trims and sometimes on walls in older Melbourne properties, won't reliably accept a new coating system without the right preparation and often a bonding primer.
A practical method comes from Lowe's guide to paint prep and the alcohol rub test. Rub a small inconspicuous area with alcohol. If paint comes off onto the cloth, you're generally dealing with a water-based coating. If it doesn't, the surface may be oil-based and may need a bonding primer after proper cleaning and sanding.
That simple test prevents a very common failure. People wash the wall, fill a few holes, roll acrylic over old enamel, and assume the job is done. Then the coating scratches, peels, or won't level properly because the substrate was never assessed.
A proper assessment also includes identifying the wall material. Older Victorian terraces and Federation homes can have lath-and-plaster or other aged plaster systems that react badly to aggressive sanding or overfilling. Modern plasterboard is more forgiving, but it still shows poor patching under low-sheen and satin finishes.
A good prep sequence only works when the diagnosis is right first. Without that, every step after it is guesswork.
Your Professional-Grade Toolkit and Materials
Cheap prep gear usually costs more in rework. If you want straight lines, flat repairs, consistent sheen, and a finish that can stand behind a 7-year workmanship warranty, the tools and materials have to match the standard of the result.
Tools that prevent avoidable defects
The basics matter, but the grade matters more. A rigid scraper that gouges plaster, bargain sandpaper that clogs immediately, or tape that lifts at the edge will all show up in the finished room.
These are the items that change the outcome:
- Flexible filling knives: Better for feathering over hairline cracks and shallow defects without leaving hard ridges.
- A proper pole sander: It keeps the sanding plane broad and even, which is critical on large wall faces where hand sanding creates hollows.
- Sharp scrapers and trimming blades: Necessary for removing loose paint cleanly rather than tearing at surrounding edges.
- Quality masking tape: On period architraves and detailed trims, cheaper tape tends to bleed or lift. Premium tape holds its edge and releases more cleanly.
- Dust sheets and site protection: Prep isn't separate from cleanliness. Good protection keeps floors, skirtings, furniture and adjacent finishes intact.
If you're comparing shopping lists, this roundup of tools you'll need to paint your home is a useful reference point because it shows the core setup needed before paint ever opens.
Materials worth paying for
Fillers are not interchangeable. Fine surface filler works well for pinholes and minor dings, but it's the wrong product for deeper voids or movement-prone cracks. Older plaster often benefits from a filler with a bit more flexibility, while deeper impact damage usually needs a firmer build product applied in stages.
Primers are where many DIY jobs go off course. A “paint and primer in one” can be fine in limited repaint situations, but it doesn't replace a dedicated stain-blocking primer, bonding primer, or sealer-undercoat where the substrate demands one.
The wall decides the primer. The label on the topcoat doesn't.
The fundamentals are straightforward:
- Stain-blocking primer: For water marks, smoke residue, or other discolouration likely to bleed.
- Bonding primer: For glossy, previously enamelled, or hard-to-key surfaces.
- Sealer-undercoat: For bare plaster or porous repaired areas that would otherwise absorb the finish unevenly.
- Caulk and gap filler: For stable joints and trim junctions, not for disguising structural movement.
We use recognised trade systems from brands like Dulux, Haymes, Taubmans, Berger and Wattyl because consistency matters when you're trying to control adhesion, build, and finish quality across varied Melbourne housing stock. The product cost is rarely the expensive part of a repaint. Failure, patchiness, and callbacks are.
A Meticulous Approach to Cleaning and Repairs
Walls must be clean, dry, sound, and free of dust, grease, and loose material before primer or topcoat goes on, as outlined in Benjamin Moore's wall preparation guidance. That isn't brand marketing. It's the technical foundation of whether the coating bonds and cures properly.
Clean first, always
Cleaning comes before repairs because filler, primer and paint don't bond properly over contamination. Kitchens, hallways, around light switches, and walls near return air grilles are usually dirtier than they look. Bathrooms add soap residue, moisture and sometimes mould contamination into the mix.
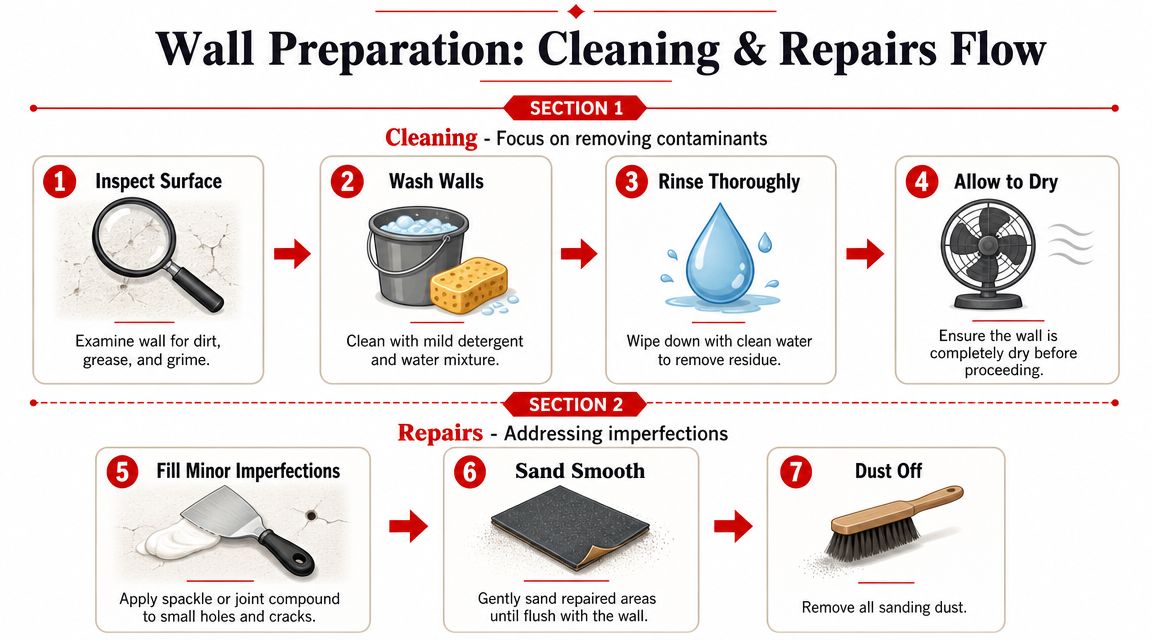
The cleaning sequence is simple, but it has to be done properly:
- Inspect the wall up close: Look for grease, hand oils, residue, smoke staining, and loose or flaking paint.
- Wash with a suitable cleaner: Use mild detergent or a grease-cutting cleaner where needed.
- Rinse off residue: Cleaner left on the wall can interfere with adhesion.
- Allow full drying: Moisture trapped under the coating can cause blistering and adhesion problems.
For occupied homes, especially where clients want to do some of the wash-down themselves before we arrive, practical guidance on safe wall cleaning techniques can help avoid over-wetting surfaces or leaving residues behind.
A short visual walkthrough is useful at this point:
Repairs that disappear under paint
Once the wall is clean and fully dry, repairs can start. The aim isn't to fill every mark quickly. The aim is to leave a flat, stable surface that won't telegraph through the topcoat.
On most interiors, the repair sequence looks like this:
- Scrape failed areas first: Any loose or flaking paint has to be removed back to a sound edge.
- Open up unstable cracks carefully: Fine movement cracks often need more than a smear over the top.
- Fill in layers where needed: Deeper holes and wider defects should be built gradually, not overpacked in one hit.
- Feather the perimeter: A proud patch will show through even forgiving sheens.
- Let repairs dry properly: Sanding or coating too early usually pulls the repair or leaves shrinkage later.
In older homes, cornice cracks and wall-to-ceiling movement lines are common. Some are cosmetic. Some indicate ongoing movement. If a crack is active, no amount of surface filler will “fix” it permanently. The best approach depends on whether you're dealing with a stable hairline defect or a recurring structural line.
Rushing repairs is the fastest way to end up with a fresh coat over old defects.
Professional standards become visible in the quality of the preparation. A surface can look acceptable in flat daylight and still fail under side light in the evening. That's why proper filling is usually a multi-pass process, followed by sanding, dust removal, spot priming, and then a final check under angled light. It takes longer, but it's what supports a finish that holds up and remains warrantable.
Sanding, Dust Control, and Strategic Priming
After repairs, the wall still isn't ready for paint. Sanding, dust removal, and priming work together. If one of those steps is skipped, the final coat usually tells on you.
Sanding creates the surface paint needs
Sanding does two jobs. It flattens repaired areas, and it creates a mechanical key across the surface so the next coat can grip properly. On glossy walls, old enamel, or surfaces with previous patching, that key matters a lot.
A few principles keep this stage clean and controlled:
- Use the right abrasive for the task: Fine finishing work needs a different grit from aggressive edge reduction. If you need a practical buying guide for finishing abrasives, this overview to find affordable 200 grit options is a reasonable starting point.
- Sand wider than the patch: The transition matters more than the centre of the fill.
- Don't hand-sand large wall fields blindly: A pole sander keeps the surface more even.
- Avoid over-sanding old plaster: You can weaken the face paper or damage fragile skim coats.
On occupied sites, dust control is part of workmanship, not a bonus. We prefer methods that keep airborne dust down and leave the room clean enough for proper inspection. A dusty wall can't be judged accurately, and it certainly shouldn't be primed.
When to spot prime and when to prime the full wall
Primer isn't there to add another can to the quote. It solves specific substrate problems. Bare filler, repaired plaster, stains, glossy coatings, and patched areas all absorb or hold paint differently. If that difference isn't corrected, the topcoat can flash, meaning you'll see dull patches, uneven sheen, or visible repair halos.
The decision usually comes down to one of these scenarios:
| Priming situation | What it's for | Best approach |
|---|---|---|
| Localised repair work | Sealing filler and patched spots | Spot prime repaired areas |
| Water staining or bleed risk | Blocking contamination from showing through | Use a stain-blocking primer on affected areas |
| Old glossy or enamelled coating | Improving adhesion of the new system | Clean, sand, then apply a bonding primer |
| Bare plaster or broad porous sections | Equalising porosity across the wall | Prime the full surface |
For readers weighing up different primer types and where each fits, this guide on what primer paint is and when it matters is a useful reference.
A common mistake is to patch, sand, wipe with a rag, and go straight to topcoat. The wall may look acceptable while wet, then the repairs stand out once dry because the absorption rate changed the sheen. Priming is what evens that out.
A wall can be smooth and still not be ready. It has to be sealed appropriately as well.
Strategic priming is also how you avoid wasting finish coats. Topcoat should build colour and sheen, not spend its first pass trying to stabilise the substrate.
Prepping for Specific Melbourne Wall Conditions
Melbourne walls don't fail in one standard way. Housing age, previous coatings, moisture, salt exposure, and wall construction all change the prep required. The right answer in a contemporary apartment isn't the right answer in a Federation home.
Different wall types need different prep
Older trims and some wall sections in established suburbs such as Hawthorn or Malvern may still carry oil-based enamel under later repainting. Those surfaces usually need thorough cleaning, controlled sanding, and a bonding primer before any acrylic system goes on. Skipping that step often leads to scratching or peeling at contact points.
Bathrooms and damp-prone rooms need a different mindset. If there's mould or mildew, painting over it is not prep. The contamination has to be removed and the cause considered first. In a St Kilda apartment, that might be poor ventilation and recurring condensation. In an older house, it might be a moisture pathway that needs further investigation before the coating system is chosen.
Lath-and-plaster walls need more care than modern plasterboard. They can be uneven, brittle at edges, and less tolerant of aggressive scraping. If you're dealing with that kind of construction, Survey Merchant's lath and plaster insights provide a useful background on why those walls behave differently during prep.
Peeling exterior surfaces are another category again. On a weatherboard in a bayside area like Brighton, salt air, UV and past paint failure can leave the surface needing heavy scraping, broad sanding, edge feathering, local timber repair, and sometimes a high-build priming approach before the topcoat system even begins.
Lead paint also changes the process entirely. If you suspect older lead-based coatings, especially in pre-1970s homes, the prep method must be adjusted for safety and containment. This overview on stripping lead paint is a sensible place to start before anyone starts dry scraping.
Wall Preparation Cheat Sheet for Melbourne Homes
| Wall Condition / Surface Type | Primary Challenge | Newline Painting's Recommended Prep |
|---|---|---|
| Older wall with possible oil-based coating | Poor adhesion with new acrylic topcoats | Test coating type, clean thoroughly, sand to create key, apply bonding primer where required |
| Bathroom wall with mould or mildew | Contamination and recurring moisture exposure | Clean and treat affected areas properly, allow full drying, then use an appropriate wet-area paint system |
| Water-damaged ceiling in an apartment | Stain bleed and softened substrate | Confirm leak source is resolved, remove unstable material, repair substrate, seal with stain-blocking primer |
| Heritage plaster wall in a Federation home | Fragile surface and visible undulations | Use gentle scraping, selective filling, broad feather sanding, targeted sealing of repairs |
| Modern plasterboard in a newer apartment | Fast prep can leave visible patch flashing | Fill, sand flush, remove all dust, spot prime or full prime depending on repair spread |
| Peeling weatherboard in bayside exposure | Failed paint edges and environmental wear | Scrape back to sound surface, sand and feather edges, repair timber where needed, use a suitable build primer before recoating |
The practical takeaway is simple. Surface condition matters more than room type. Two “bedroom walls” can need completely different prep if one sits in a renovated apartment and the other sits in a Kew period home with old coatings and aged plaster.
Final Checks and When to Call a Professional
Before painting starts, the wall should feel finished even though it isn't painted yet. That's the standard. If the substrate is still rough, dusty, patchy, or uncertain, the topcoats won't rescue it.
The pre-paint checklist we use on site
A proper final check is tactile as much as visual. Run your hand over the wall. Look along it with angled light. Check repaired sections from more than one direction, because side light exposes ridges and shallow depressions that front-on viewing hides.
The last pass should confirm a few things:
- Repairs are flush: No proud edges, pinholes, sinkage or rough knife marks
- Dust is gone: Not moved around, completely removed
- Primer is where it needs to be: Especially over repairs, stains and difficult substrates
- Masking is secure and tidy: Loose tape edges and dirty tape lines create avoidable detail defects
- The surface is stable: No loose flakes, soft spots, or fresh signs of moisture
If the wall still needs explaining before paint goes on, it probably still needs prep.
Jobs that should not be treated as standard repaints
Some work sits outside normal wall prep and should be handled by a trade-qualified team. Extensive plaster failure, suspected lead paint, recurring moisture issues, multi-level exteriors, and heritage details with fragile substrates all carry extra risk.
That's where process and accountability matter. A contractor needs systems for site protection, substrate diagnosis, primer selection, supervisor sign-off, and final walkthrough, not just people who can roll paint onto a wall. For larger or more complex jobs, insurance also matters. Newline Painting carries $20M public liability insurance and backs workmanship with a 7-year warranty, which only makes sense when the preparation standard is high enough to support the finish.
If you're weighing up whether a wall is ready, be honest about what you're seeing. Minor filling and standard prep are one category. Active damage, uncertain coatings, and older hazardous materials are another. Knowing the difference is part of doing the job properly.
If you want a professional opinion on wall condition before you commit to painting, request a free on-site quote from Newline Painting or call 1300 044 206. We service Melbourne homes, apartments, heritage properties and investment refreshes, and we'll tell you plainly what needs prep, what doesn't, and what it will take to achieve a long-lasting finish.