You're standing in a hallway in a Victorian terrace, looking at cracked gloss on an architrave or lifting paint on old weatherboards, and the same question comes up every time. Do we strip it, or do we leave it alone and seal it properly?
On older Melbourne homes, that decision matters more than the finish coat. In pre-1970 properties, the working assumption should be that legacy coatings may contain lead until they're tested, and the primary hazard begins when sanding, scraping, or careless prep turns that coating into dust that moves through the house. Australian health guidance treats homes built before 1970 as the key risk group and warns that renovation activity can release hazardous lead dust from older paint systems, which is why stripping lead paint is as much a containment job as a painting job (guidance on lead paint abatement and older housing).
For Melbourne homeowners in Camberwell, Kew, Albert Park, Hawthorn, Malvern, and similar areas with period housing stock, the right answer often isn't “strip everything”. It's “assess the condition, test it properly, choose the lowest-risk method, and only remove what needs removing”.
Table of Contents
- Is Stripping Lead Paint Necessary for Your Melbourne Home?
- Identifying Lead Paint Before You Begin
- Containment and PPE The Non-Negotiables
- Comparing Safe Removal Methods
- Lead-Safe Cleanup and Waste Disposal in Victoria
- When to Hire a Professional Lead Paint Removalist
Is Stripping Lead Paint Necessary for Your Melbourne Home?
No, stripping lead paint isn't always necessary, and on many occupied heritage homes it isn't the first option I'd recommend.
A common Melbourne scenario is a Federation home with flaky sills, cracked enamel on skirtings, or weathered eaves where the paint system has failed in patches but much of the substrate is still sound. In that situation, full removal can create more risk than benefit if the coating is otherwise stable enough to isolate, seal, and overcoat with a modern system.
Independent guidance is clear that paint removal is only one option, and that enclosure or encapsulation can be easier, cheaper, and less disruptive than full removal, especially in occupied homes (independent guidance on alternatives to full removal). That lines up with practical heritage work in Melbourne, where the safest job is often the one that creates the least dust and the least disturbance to original fabric.
The first decision is condition, not preference
If the paint is intact, well-adhered, and not breaking down under everyday contact, encapsulation is often the smarter path. That usually means stabilising loose edges, priming appropriately, and locking the old coating beneath a durable modern system rather than chasing bare timber or plaster everywhere.
If the coating is failing badly, interfering with adhesion, trapping moisture, or breaking down on windows, doors, and friction points, selective removal becomes more defensible. Heritage trims, sash components, and weatherboards often need that finer judgement rather than a blanket rule.
Practical rule: If the old coating can stay in place safely, leaving it in place is often lower risk than stripping it for the sake of neatness.
That's also why heritage painting needs a different mindset from standard repainting. The best result usually comes from preserving what's stable and only disturbing what can't responsibly be left. That approach is central to preserving Melbourne's period homes with a proper heritage painting process.
Identifying Lead Paint Before You Begin
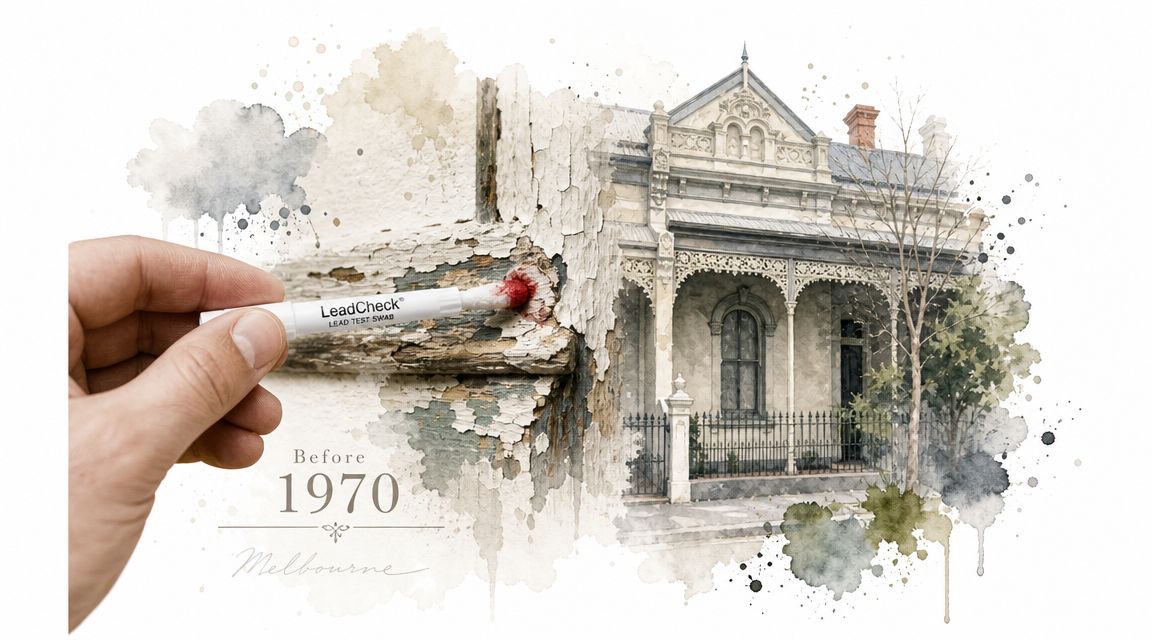
A common Melbourne scenario goes like this. A homeowner pulls back a loose flap of paint on a sash window in an Edwardian or Victorian house, sees half a dozen older layers underneath, and assumes the next step is to strip it back to bare timber. That is the point to stop and identify what you are dealing with first.
Before any prep starts, treat paint on a pre-1970 home as potentially lead-containing until testing proves otherwise. On heritage properties, that assumption protects both the household and the building fabric. It also helps you make the right call early on. Some surfaces should be removed in a controlled way, and some are better stabilised and left in place.
Start with the building, then the paint system
In Melbourne, the usual high-risk houses are easy to recognise. Victorian terraces, Edwardians, Californian bungalows, and older weatherboards often carry many repaint cycles across weatherboards, eaves, doors, windows, skirtings, and architraves. The topcoat may look modern. The lower layers are the concern.
Age alone does not confirm lead, but it does set the risk level. Condition matters just as much. Thick paint build-up, brittle alligatoring, old enamel finishes on trim, and repeated failure around friction points all suggest an older coating system that deserves proper testing before anyone disturbs it.
If the paint is peeling, check whether the failure is local or systemic. Moisture ingress, trapped condensation, timber movement, and incompatible recoats can all cause breakdown that has nothing to do with lead content. This guide on what causes peeling paint and how to assess the failure properly helps separate a coating defect from a contamination issue.
DIY swabs have a place, but know their limits
For a small, isolated area, a lead test swab can be a reasonable first screen. It is quick, relatively inexpensive, and useful when you need to decide whether a windowsill, door frame, or section of trim should be handled under lead-safe controls.
Swabs are not the final word. On old Melbourne homes, there may be several newer coats over the original finish, and a surface test can miss lead if the lower layers are not reached properly. A negative swab on one spot does not clear the whole room, and it tells you very little about exterior elevations, multiple substrates, or heavily layered joinery.
For broader work, professional testing is the safer standard. That usually means laboratory analysis of samples or XRF testing to identify lead in painted elements with minimal disturbance. On a heritage property, that extra certainty affects more than the stripping method. It can change the scope, the containment plan, the waste stream, and in some cases whether removal is justified at all.
Decide based on scope, occupancy, and heritage risk
The testing method should match the job.
- One small suspect area: A field swab may be enough to decide whether to stop and bring in lead-safe controls.
- Several rooms, exterior weatherboards, or full repaint preparation: Professional testing gives a clearer map of where lead is present and where it is not.
- Original joinery, decorative trims, and fragile plaster: Use the least destructive testing method that still gives a reliable result.
- Homes occupied by children, pregnant residents, or anyone with higher health risk: Skip guesswork and arrange professional assessment.
That decision point matters. A positive result does not automatically mean full stripping is the right answer. On many heritage jobs, the better option is selective treatment or encapsulation of sound coatings rather than broad removal.
Identification also means planning the people side of the job
Once lead is suspected or confirmed, the job needs a documented safety approach before tools come out. For contractors, that includes making sure workers are trained, the site setup suits the task, and respiratory and protective equipment are chosen for the actual exposure risk. If you are managing trades on your property, ask how they develop an effective PPE program and how that program applies to lead dust, clothing control, and decontamination on an occupied home.
On Melbourne heritage work, the best early decision is often the one that avoids unnecessary disturbance. Identify the paint properly first. Then decide whether removal is warranted, or whether stabilising and encapsulating the existing system is the lower-risk solution.
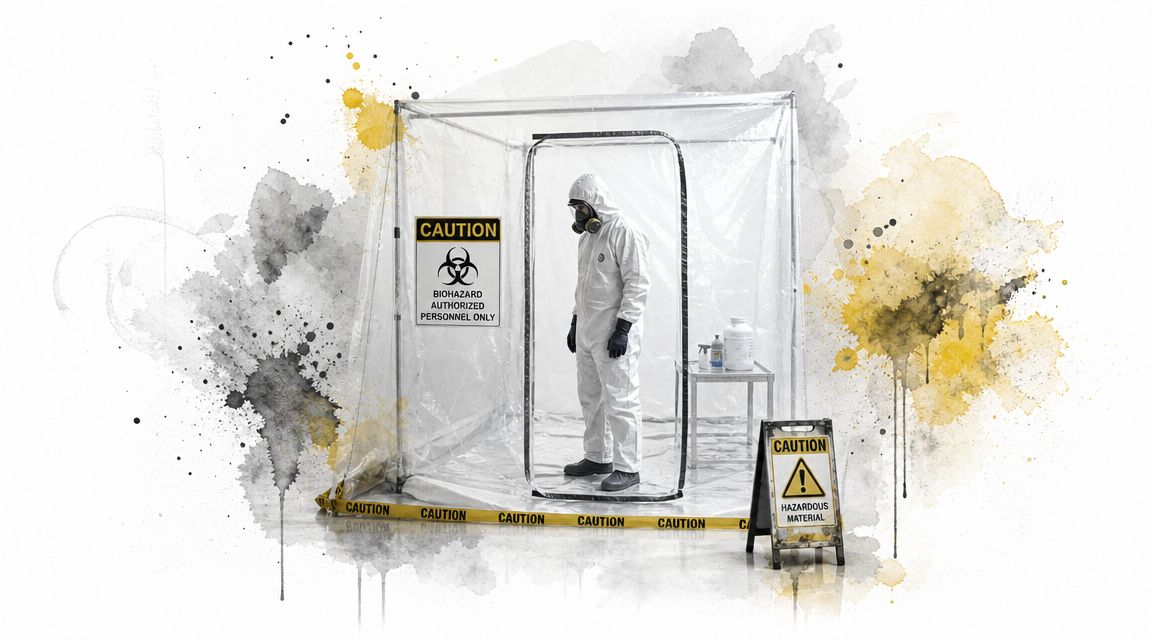
Containment and PPE The Non-Negotiables
If lead is present, containment isn't an optional extra. It's the job.
The biggest failure on lead work isn't usually the stripping itself. It's dust leaving the workface and travelling into hallways, carpets, return-air paths, window tracks, and adjoining rooms. Lead-safe renovation guidance calls for removing or sealing furniture, taping plastic sheeting over floors and openings, and using an airlock so contamination doesn't migrate through the home. The same guidance explicitly warns against dry sanding, machine sanding without HEPA extraction, and open-flame burning, while favouring controlled methods such as wet scraping and HEPA-equipped tools (lead-safe renovation setup and prohibited methods).
Containment comes before tools
On an occupied heritage property, I'd set the work area before discussing removal method. If you can't isolate the area properly, you shouldn't be stripping lead paint there.
A proper setup includes:
- Room clearing: Remove movable furniture, rugs, curtains, and soft items from the area wherever possible.
- Fixed-item sealing: Anything that stays gets fully wrapped or sealed so dust can't settle into fabric or joints.
- Floor protection: Plastic sheeting is taped and lapped so chips and slurry can be collected without leakage.
- Opening control: Doorways, vents, and other paths of movement are sealed. If access is needed, create an airlock-style entry.
- Traffic management: People who don't need to be there stay out. That includes pets.
Exterior work gets harder, not easier. Once you're on weatherboards, eaves, windows, or gables, you're managing wind, access, landscaping, neighbouring boundaries, and uneven ground. On older homes in tighter inner suburbs, containment often decides whether a DIY plan is realistic.
If the debris can't be captured and the area can't be isolated, the method isn't lead-safe, even if the scraper or sander looks “gentle”.
For readers who manage teams or contractors regularly, Safety Space has a practical overview on how to develop an effective PPE program. The point on lead work is simple. PPE only works when it's selected, fitted, used, and removed in a controlled way.
PPE has to stop dust leaving with you
The basic kit needs to protect breathing, skin, eyes, and clothing, but it also needs to stop contamination walking into the kitchen or car.
Use PPE with a clear purpose:
- Respiratory protection: A properly fitted respirator suitable for fine hazardous dust matters more than a basic nuisance mask.
- Disposable coveralls: These stop dust loading into everyday clothing and reduce transfer outside the work zone.
- Gloves: Use gloves that suit the method, especially if wet scraping or chemical stripping is involved.
- Eye protection: Scraping overhead trims, cornices, and windows throws debris where you don't want it.
- Dedicated footwear control: Disposable boot covers or a controlled decontamination step at the exit reduce tracking.
This video gives a useful visual on how strict lead-safe work practices need to be in real conditions.
For any contractor, the risk isn't theoretical. Lead dust claims involve real health exposure, real cleanup consequences, and real liability. That's one reason serious painting firms carry meaningful cover. On higher-risk residential work, accountability matters just as much as method, especially when people are still living in the property.
Comparing Safe Removal Methods
A homeowner in Albert Park or Kew will often ask the wrong first question. They ask how to strip the lead paint, when the actual question is whether stripping is the right call at all.
On a Melbourne heritage property, full removal is only one option. If the existing coating is largely stable, the substrate is sound, and the goal is to stop exposure rather than expose bare timber at any cost, professional encapsulation can be the lower-risk decision. Stripping makes sense when paint is failing, windows or doors are binding through thick paint build-up, moisture has broken the coating system down, or repair work demands access to the substrate. If the paint is mostly intact, broad removal can create more contamination than it solves.
Choose the method to suit the surface and the outcome
The safest method is usually the one that removes the least material needed to get a stable, paintable surface. On heritage work, that also helps preserve original joinery, mouldings, and plaster detail that you do not get back once it is gouged, rounded off, or heat-damaged.
Wet hand scraping is still the best starting point on many jobs. It gives good control on weatherboards, trims, and isolated failing sections. It is slow work, but slow is often what protects old timber profiles and keeps dust down.
HEPA-equipped sanding is a finishing method, not a bulk removal method. I use it to feather edges after loose paint has been lifted. If someone is planning to machine back whole elevations or chew through multiple old coats with a sander, that is usually a sign the removal strategy needs to be reconsidered.
Low-temperature heat has a place on detailed timber where scraping alone will not release built-up layers cleanly. The trade-off is operator control. Too much heat can damage fragile timber, crack old glass putty, and increase the hazard from the coating. Open-flame burning has no place on lead-painted residential work.
Chemical stripping often suits ornate elements better than sanding does. On brackets, turned timber, doors, and old sash components, it can lift stacked coatings with less physical damage to the profile. The drawbacks are obvious on site. It is messy, it takes time, residue has to be managed properly, and the softened waste is still lead-contaminated.
Abrasive blasting is specialist work only. On a domestic heritage property, it is rarely the right answer for an occupied site and never a casual DIY option. Even where a contractor proposes it, the questions should be about containment, dust capture, surface loss, and waste handling in Victoria, not speed.
On lead-painted heritage surfaces, the best method is the one that solves the building problem with the least disturbance.
Removal compared with encapsulation
Melbourne homeowners are often deciding between two paths, not five. Remove the coating, or leave it in place and isolate it under a suitable system.
| Option | Best For | Advantages | Limitations |
|---|---|---|---|
| Selective lead paint removal | Failing paint, friction surfaces, repairs that require bare substrate, heavy build-up on windows and doors | Addresses the source of failure, reduces thickness where movement keeps breaking paint films, allows proper substrate repairs | Higher contamination risk, slower process, more waste, more legal and disposal obligations |
| Professional encapsulation | Stable lead paint in sound condition, broad wall areas, lower-disturbance projects in occupied homes | Lower disturbance, usually faster, often safer for residents if done correctly | Does not remove the lead, unsuitable over unstable coatings, future disturbance still needs lead-safe controls |
That decision matters more than product choice. A stable wall in a lived-in house may be better encapsulated by a contractor who knows lead-safe prep than aggressively stripped by a homeowner chasing a clean-looking result.
Comparison of Lead Paint Removal Methods
| Method | Best For | Pros | Cons & Risks |
|---|---|---|---|
| Wet hand scraping | Localised failure on trims, weatherboards, windows, doors | Good control, low dust when kept damp, helps preserve fragile details | Labour-intensive, easy to leave loose edges behind if rushed |
| HEPA-equipped sanding | Final feathering and smoothing after loose paint is removed | Cleaner finish, controlled dust capture when set up correctly | Poor choice for broad removal, bad setup spreads contamination quickly |
| Low-temperature heat gun | Thick layered paint on timber details | Can release stubborn paint with less abrasion than sanding | Overheating increases hazard and can damage old timber, putty, and glass |
| Chemical stripping | Ornate timber, multiple old layers, delicate profiles | Low mechanical damage, useful on detailed shapes | Slow, messy, residue-heavy, still requires strict lead-safe handling |
| Professional abrasive methods with full controls | Selected specialist applications only | Can deal with difficult build-up in experienced hands | High contamination risk and possible surface loss without full specialist controls |
A few practical examples help with the decision.
- Flat weatherboards: Selective wet scraping and limited HEPA-assisted feathering usually make more sense than full strip-back.
- Ornate corbels and brackets: Chemical stripping or carefully controlled low heat often protects the profile better than sanding.
- Old sash windows and other friction points: Removal is sometimes justified because paint build-up keeps breaking, binding, or shedding at moving surfaces.
- Interior trims in occupied rooms: If coatings are stable, encapsulation is often the safer option.
For Victorian homeowners, method choice also affects compliance. The moment lead-painted waste, slurry, contaminated sheeting, and disposable PPE start coming off the job, disposal rules apply. That is one reason I tell clients to decide on scope before they start. A small, controlled stabilisation job is one thing. A full strip can shift the whole project into territory where licensed trades and documented disposal are the sensible choice.
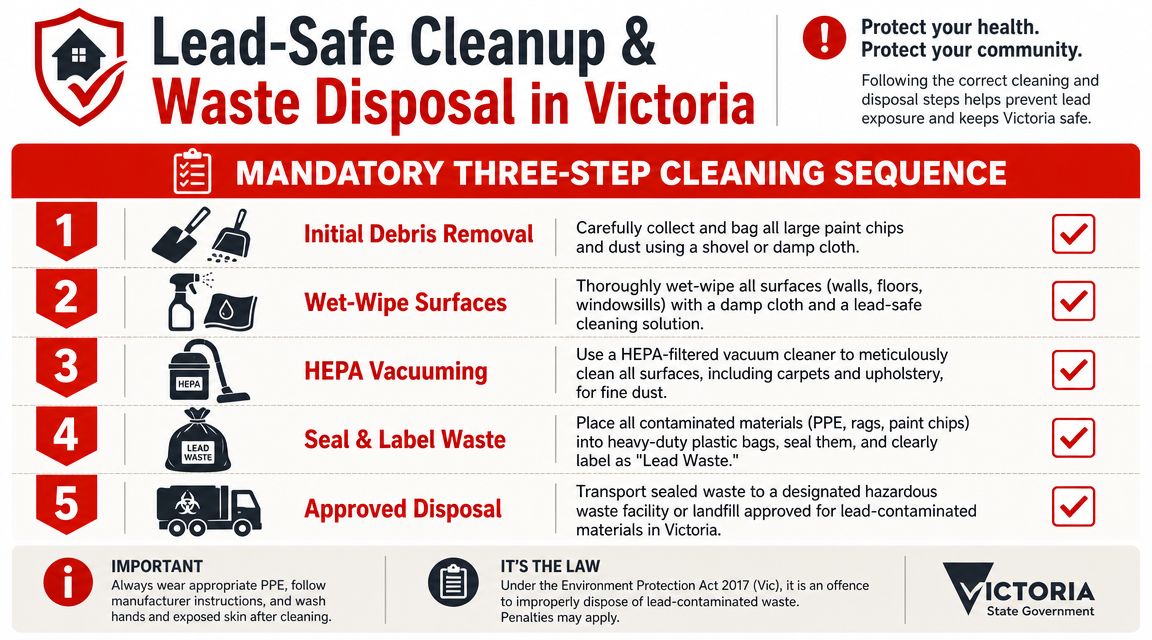
Lead-Safe Cleanup and Waste Disposal in Victoria
When the removal stops, the cleanup standard has to stay just as strict. A neat-looking room can still be contaminated.
Lead-safe guidance recommends misting debris, double-bagging waste in heavy-duty plastic, then HEPA-vacuuming all contaminated surfaces and wet-mopping hard floors. It also states that a standard household vacuum is unsuitable because it will recirculate fine lead dust back into the home (lead-safe cleanup and why household vacuums are unsuitable).
The cleaning standard is higher than most DIY guides suggest
Cleanup needs to be systematic, not improvised. The sequence matters because each stage reduces what the next stage has to deal with.
Use a disciplined process:
-
Collect bulk debris first
Pick up paint chips, slurry, disposable sheeting, used wipes, and visible residue carefully. Keep debris damp where appropriate so you're not flicking dry particles into the air. -
HEPA vacuum contaminated surfaces
Vacuum floors, sills, skirtings, ledges, trims, and any surface inside the containment zone. Hidden reservoirs matter. Dust doesn't stay politely on the floor. -
Wet-clean hard surfaces
Wipe and wash hard surfaces after vacuuming so the fine residue is removed, not just redistributed. -
Repeat the cleaning sequence
A second HEPA-and-wipe pass is good practice before the area goes back into normal use.
Clean enough to paint isn't the same as clean enough to re-occupy.
Carpet edges, window tracks, vents, and adjacent rooms are where sloppy jobs show up later. Even a small patch repair can contaminate more area than people expect if chips and dust weren't contained properly.
Waste handling in Victoria needs checking before the job starts
Every contaminated item should be treated as part of the waste stream. That includes paint chips, used plastic, disposable PPE, rags, wipes, and other cleanup materials.
Handle waste this way:
- Bag it securely: Double-bag contaminated material in heavy-duty plastic.
- Seal it before moving: Don't carry open debris through the house or yard.
- Keep it segregated: Don't mix it loosely with general renovation rubbish.
- Label clearly: Make it obvious that the contents are lead-contaminated waste.
- Confirm disposal locally: Check with your local council or EPA Victoria before disposal so you're using the approved pathway for domestic hazardous waste.
That last step is where many DIY guides fall short. They spend pages on scraping technique and almost nothing on disposal. In Victoria, that's the part you want clarified before the first sheet of plastic goes down, not after the bags are sitting in the garage.
When to Hire a Professional Lead Paint Removalist
You should hire a professional when the project is large, occupied, external, highly deteriorated, or difficult to contain properly.
That threshold arrives sooner than many homeowners expect. A single window sash or isolated section of trim is one thing. An exterior weatherboard elevation, multiple rooms, or a house with children in residence is another category entirely.
The job has crossed the line when containment gets complex
Exterior work is the clearest example. Health guidance for exterior lead paint removal says workers should cover the ground with six-mil poly sheeting extending 10 feet from the base or to the property line, which shows how quickly contamination control moves beyond the wall you're scraping (exterior lead paint removal and ground protection guidance).
That level of control is hard enough on a detached block. On tighter Melbourne sites, with paths, fences, gardens, cars, neighbours, and changeable weather, it gets harder again.
Bring in a specialist when any of these apply:
- The surface area is broad: Large-scale stripping multiplies debris, labour, and cleaning load.
- The coating is badly degraded: Heavy cracking, alligatoring, or repeated failure usually means more disturbance and more contamination risk.
- The work is external: Wind and ground contamination make containment much more demanding.
- The home is occupied by vulnerable residents: If children or pregnant occupants are in the house, the margin for error is much smaller.
- The substrate is heritage-sensitive: Original joinery, detailed mouldings, and old timber deserve controlled methods and experienced judgement.
- You're unsure about disposal obligations: If the waste pathway isn't clear, stop there.
There's also a practical overlap with other building issues. When lead paint failure is tied to leaking windows, swollen timber, or moisture-damaged linings, the hazard isn't only the coating. In those cases, it helps to think the way restoration trades do when they assess contamination and source damage together. This article on tips for finding Phoenix water damage help is from a different trade and market, but the principle is useful. Don't choose on price alone when the underlying problem involves hidden spread, sequencing, and cleanup standards.
Professional help also means choosing not to strip
A good lead paint removalist doesn't just arrive with more equipment. They should also be prepared to tell you that full removal isn't the best option.
On many heritage properties, the responsible answer is selective removal in failure zones, followed by stabilisation and encapsulation elsewhere. That reduces disruption, protects original material, and lowers contamination risk compared with chasing every old layer back to bare substrate.
Accountability matters here. If you're comparing contractors, check what insurance they carry and whether they can explain their containment process clearly. For painters, that isn't a marketing extra. It's part of the risk framework, and it's worth understanding why public liability insurance matters on residential painting work.
The safest lead job is usually the one with the clearest scope, the least unnecessary disturbance, and a cleanup standard that matches the hazard.
If you're dealing with failing paint on a Melbourne heritage home and want a clear recommendation on whether to strip, encapsulate, or replace selected elements, Newline Painting can inspect the site and provide a free on-site quote with practical advice on scope, prep, paint system selection, and safe staging. You can also call 1300 044 206 to discuss the property.