
If you're looking at your weatherboards and thinking, “The paint still looks mostly fine, but a few spots are lifting,” that's usually the point where the main decision starts. In Melbourne, weatherboard painting isn't just about colour refresh. It's about whether the coating is still protecting the timber from moisture, movement and UV, or whether it's already failing in ways that will cost more if left alone.
That matters more here than many owners realise. Melbourne's weather shifts quickly, north and west elevations cop the harshest sun, and older timber homes in places like Kew, Hawthorn, Brighton and Albert Park often carry decades of repaint history under the top layer. A weatherboard repaint that lasts comes from matching the process to the house and to local conditions, not from rushing through prep and hoping the topcoat hides everything.
Table of Contents
- How to Assess Your Weatherboards for Repainting
- The Critical Surface Preparation and Repair Process
- Choosing the Right Primer and Paint System
- Professional Application Methods and Sequencing
- Timelines and Cost Ranges for Melbourne Projects
- DIY vs Hiring a Professional Painting Service
- Long-Term Maintenance for Painted Weatherboards
How to Assess Your Weatherboards for Repainting
The first job is to work out whether you're looking at normal wear or a failing coating system. A lot of owners only notice peeling, but by that stage the paint has often been breaking down for a while.
What to look for before you call a painter
Start with the obvious signs. Peeling, flaking, blistering and cracking all suggest the coating has lost adhesion or flexibility. On timber, that usually means the paint film is no longer moving with the substrate, or moisture has got involved.
Then look closer at the less obvious signs:
- Chalking on the surface means the old paint is breaking down and leaving a powdery residue on your hand.
- Tannin staining often shows as brownish discolouration bleeding through lighter colours, especially around knots or bare timber repairs.
- Open joints and failed gaps around trims, window heads and board laps often point to movement and water entry.
- Mould or moss growth usually shows up on shaded sides, lower walls and areas with poor airflow.
On older Australian weatherboards, the right approach isn't to guess from the street. Guidance for legacy coatings says painters should treat moss and mould first, then wash with a paint prep solution to remove dirt and chalky buildup. After drying, the surface needs to be reassessed because spot-priming alone may not be enough if the old film has lost integrity, as noted in Resene's advice for painting weatherboards.
Practical rule: If the surface looks tired but still feels firm and bonded, you may be in repaint territory. If paint is lifting in multiple areas, boards are soft, or staining keeps returning, the job usually needs repair work before coating.
A quick self-check around the house
A simple walkaround tells you a lot if you do it methodically.
| Area to inspect | What to check | What it usually means |
|---|---|---|
| North and west walls | Fading, brittleness, lap marks from old work | Heavy UV exposure |
| South side and shaded sections | Mould, dampness, slow drying | Ongoing moisture exposure |
| Window sills and bottom edges | Peeling, swollen timber, failed caulk | Water sits here first |
| Board joints and end-grain | Hairline cracks, exposed timber | Early entry point for moisture |
| Fascias and eaves junctions | Flaking around edges | Poor previous prep or water tracking |
If you own a period home in Hawthorn or a bayside weatherboard in Brighton, pay particular attention to window surrounds, lower boards and sun-hit elevations. Those are usually the first places where coating failure stops being cosmetic and starts becoming a building maintenance issue.
The Critical Surface Preparation and Repair Process
A durable weatherboard repaint is built in the prep stage. If the substrate isn't sound, dry and properly repaired, the finish won't hold, no matter how good the topcoat is.
Why prep decides the outcome
Timber moves. That's the technical issue behind a lot of failed weatherboard jobs in Victoria. Guidance tied to AS/NZS 2311 makes the point clearly. Timber expands and contracts with moisture, so the surface has to be sound and dry before coating if you want the paint system to remain flexible and avoid blistering or peeling from trapped moisture, as outlined in this reference to the exterior painting standard and substrate preparation requirements.
That's why superficial prep fails. If someone paints over loose edges, damp boards, open joints or rotten patches, the new coating inherits the old problems.
This infographic shows the prep sequence clearly.
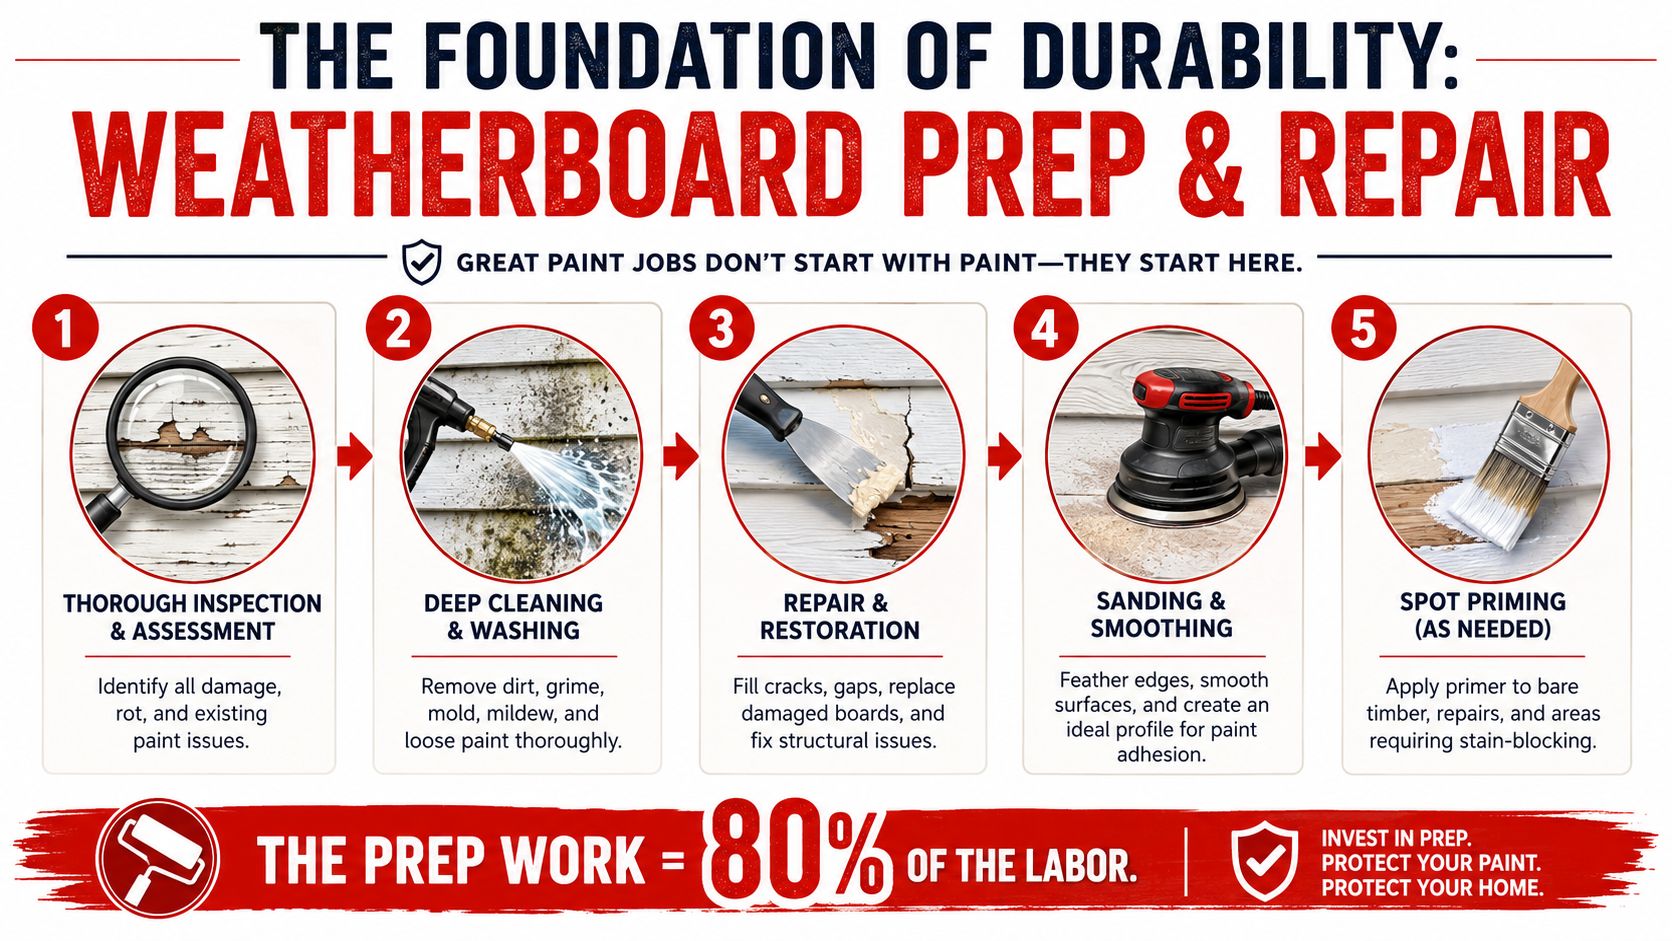
The sequence that actually works
A proper exterior prep program usually follows this order:
-
Inspection and sounding out the timber
Failed boards, soft spots, split end-grain and unstable filler need to be identified before anything gets coated. -
Wash down and contamination removal
Dirt, chalk, pollution, mould and loose material all interfere with adhesion. The wash stage isn't just about appearance. It tells you what's bonded once the surface dries. -
Scraping and sanding
All loose paint has to come off. Edges then need to be feather-sanded so you don't telegraph ridges through the finish. -
Repairs and gapping
Nail holes are set and filled. Open joints are sealed where appropriate. Decayed timber is repaired or replaced. On many Federation homes in Camberwell or Malvern, significant effort often goes into these tasks. -
Spot priming or full priming, depending on condition
Bare timber, repairs and stains need the right primer before undercoats and topcoats go on.
For owners comparing levels of prep across different surfaces, this London homeowners' guide to painting walls is useful because it shows the same basic truth in another context. Paint only performs as well as the surface underneath it.
Later in the job, once repairs are complete, the rest of the exterior system can be built out properly. If you want to see how that fits into a full house repaint scope, this overview of exterior house painting in Melbourne is the relevant reference.
Before any coating starts, there also needs to be a realistic site check for moisture, access and repair sequencing.
On weatherboards, the best paint system in the wrong sequence still fails. Prep first. Repairs second. Coating only starts once the timber is ready.
Choosing the Right Primer and Paint System
A proper paint system is selected by substrate condition and exposure, not by brand name alone. On weatherboards, every layer has a job.
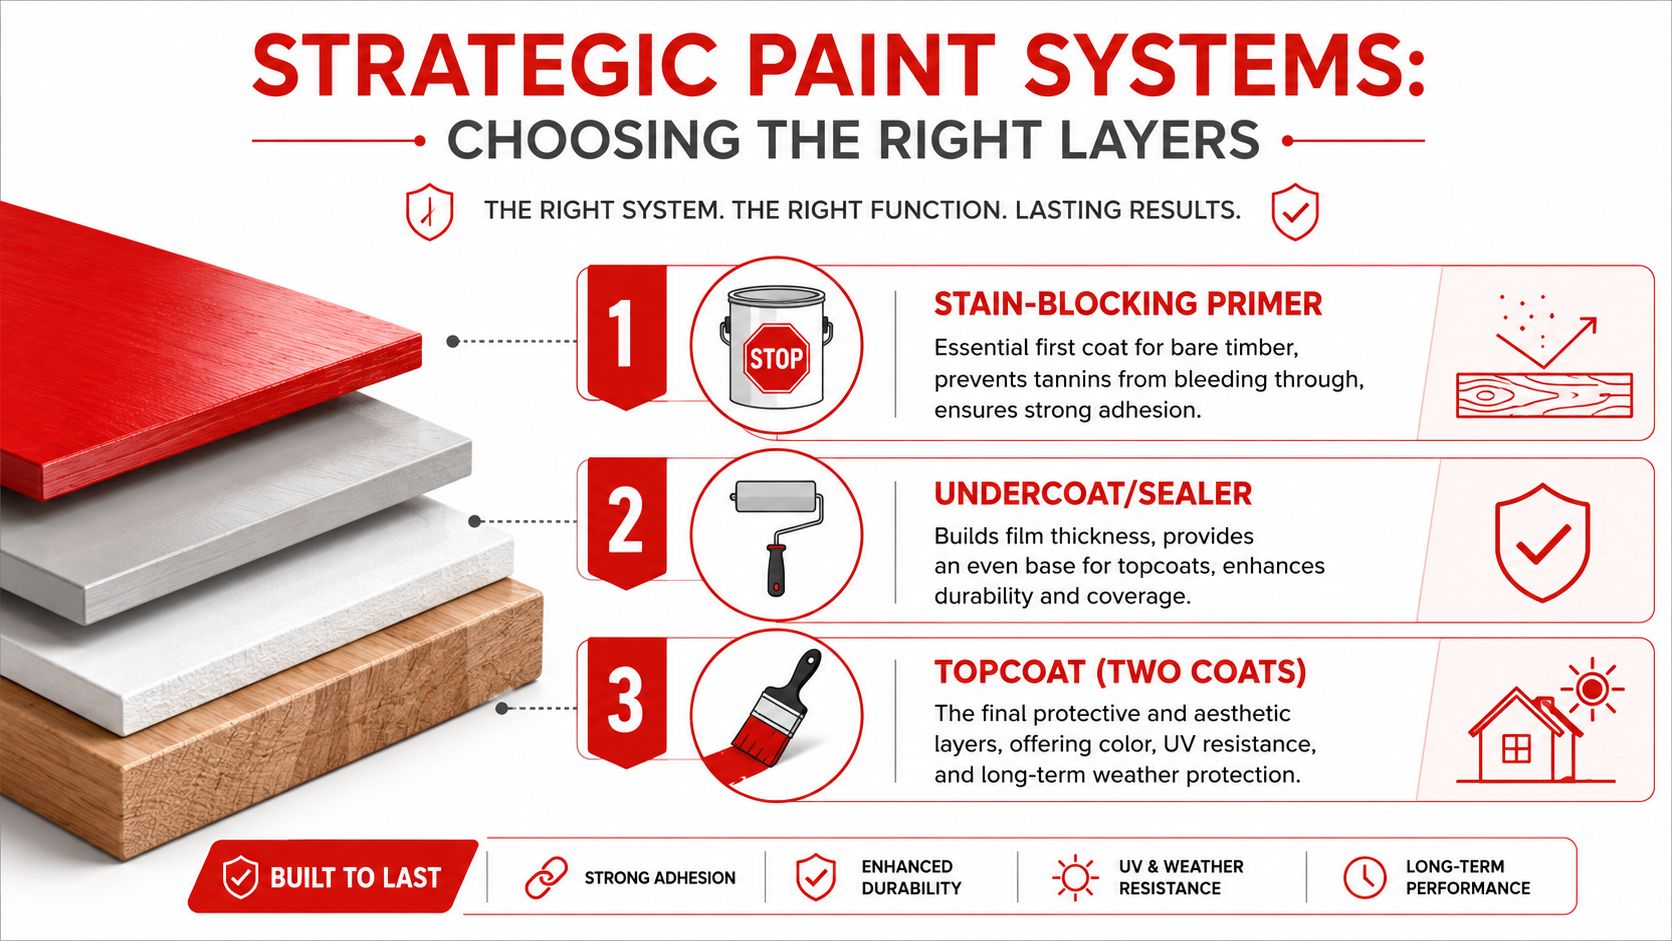
A paint system is more than a topcoat
Most durable weatherboard painting systems include primer, undercoat and two finish coats. That layered build matters because protection comes from adhesion, flexibility and film thickness working together.
In Melbourne conditions, modern 100% acrylic exterior systems are usually the first choice for broad weatherboard faces because they handle movement well and hold colour better across variable sun and moisture exposure. For trims, windows and some heritage details, painters may still specify enamel systems where the existing substrate and finish requirement justify it.
The key layers usually look like this:
- Stain-blocking primer for bare timber, water marks, tannin bleed and repaired sections.
- Undercoat or sealer to even porosity and build a stable base.
- Two topcoats for colour, UV resistance and the final protective film.
What to expect in a proper specification
A serious quote should name the system, not just “paint exterior walls”. It should tell you what gets spot-primed, whether full undercoating is included, and what finish goes on each element.
Here's the practical breakdown most owners should expect:
| Element | Typical coating approach | Why it differs |
|---|---|---|
| Weatherboard faces | Acrylic low-sheen or similar exterior finish | Better flexibility and broad-area appearance |
| Windows and trims | Semi-gloss or gloss system where appropriate | Harder-wearing finish and easier cleaning |
| Bare timber repairs | Primer first, then system build | Stops uneven absorption and staining |
| High-risk stained areas | Stain-blocking product | Prevents bleed-through into finish coats |
In Melbourne, where one elevation can bake while another stays cool and damp, low-sheen acrylic on the main boards usually gives the best balance of durability and appearance. High gloss on broad boards tends to show every undulation and repair.
If you want a primer-focused breakdown before comparing quotes, this guide to paint primers and when to use them is the useful starting point.
One other point that gets missed in cheap quotes is film build. If a painter thins product too hard to make it flow further, you may get coverage in colour but not enough dry film for long-term protection. That's a system problem, not just a paint choice problem.
Professional Application Methods and Sequencing
The best application method is the one that matches the surface, the weather window and the amount of detail on the house. Professional weatherboard painting is as much about sequence as it is about product.
The order of work matters
On most houses, work starts at the top and moves down. Eaves, fascias, gutters where included, and upper trims are dealt with first. Windows, corner boards and details follow. Main wall expanses are usually finished after the edges and trims are under control.
That order reduces rework. It also helps keep lines clean, especially on older homes with layered trim profiles and uneven timber. On a Kew Edwardian or a Richmond weatherboard cottage, jumping around the facade often creates avoidable touch-ups.
A sound sequence also helps with weather exposure. Australian painting specifications require exterior surfaces to be clean and moisture-free, and work should stop in rain, fog or mist. They also warn that insufficient dry film thickness from over-thinning or poor conditions is a primary predictor of early breakdown, as noted in this exterior painting specification covering weather and coating conditions.
If the wall is only “dry” because the sun has just hit it, that's not dry enough. Surface moisture and late-day condensation can undo a decent application very quickly.
Brush roller and spray each have a place
There isn't one universal method for every weatherboard exterior.
- Brushing gives the best control on edges, laps, sills, windows and heritage details.
- Rolling helps load paint onto broad faces and can maintain better film build on weatherboards than overspraying alone.
- Airless spraying is efficient on large, open sections, but it still needs skilled masking, back-rolling or back-brushing where required, and close control around neighbouring properties and landscaping.
A key skill is maintaining a wet edge. On warm or windy Melbourne days, that's what prevents lap marks and flashing. North-facing elevations are usually tackled differently from shaded sides because the wall temperature can change faster than the ambient temperature suggests.
On occupied homes, the workflow also has to fit around access, cars, clotheslines and daily movement. That's where professional site management matters just as much as brushwork.
Timelines and Cost Ranges for Melbourne Projects
The honest answer is that timeline and cost depend more on condition than on house size alone. Two homes with similar footprints can be completely different jobs once failed coatings, repairs and access are accounted for.
What changes the timeline
A standard weatherboard repaint typically moves through washing, drying, prep, repairs, priming and finishing coats. The slow part is rarely the painting itself. It's the drying and repair window between stages, especially if the house has multiple elevations with different exposure.
Melbourne's climate makes scheduling critical. Guidance for exterior painting in Australian conditions points to 15–20°C with moderate humidity as the ideal range, and painters often work on the shady side of the house as the sun moves to avoid premature drying and lap marks, as explained in this Resene article on painting conditions.
That's why spring and autumn are usually the most workable periods for exterior repainting here. Summer can be too hot on exposed walls. Winter often shortens usable windows because surfaces stay damp longer, especially on the south side.
A realistic timeline usually expands when you have:
- Extensive prep such as widespread scraping, sanding and failed caulk replacement
- Timber repairs around windows, corners, sills or lower boards
- Double-storey access that needs more setup and movement
- Heritage detail including turned posts, fretwork or layered trim profiles
- Unsettled weather that interrupts wash, dry and coating cycles
What changes the cost
Cost is driven by labour intensity, coating scope and access complexity. The biggest variables are usually substrate condition and detail, not just square metres.
For example, a straightforward single-storey home with stable existing coatings is a different proposition from a bayside weatherboard with salt exposure, brittle paint and ornate Federation trims. The second house takes longer to prep, mask and detail, even before the first finish coat goes on.
When comparing quotes, check whether they specify:
| Cost factor | Why it matters |
|---|---|
| Prep allowance | Cheap quotes often understate sanding, scraping and repairs |
| Timber repair scope | Minor filling and actual board repair are not the same thing |
| Number of coats | A vague quote can hide an underbuilt system |
| Access setup | Upper levels, tight boundaries and obstacles add labour |
| Detail level | Windows, trims and heritage elements take time |
For owners trying to sense-check project budgeting before site meetings, this Australian painting cost calculator is a useful planning tool. It won't replace an on-site assessment, but it helps frame the variables that matter.
DIY vs Hiring a Professional Painting Service
DIY weatherboard painting can work on small, stable areas with safe access. A full exterior repaint on an older Melbourne timber home is a different category of job.
When DIY can work
If you're touching up a small, low-risk section on a single-storey wall, and the existing system is stable, DIY may be reasonable. The surface still needs to be cleaned, repaired and primed correctly, but the scope is manageable.
That changes quickly once height, repair work or widespread failure enters the picture. Weatherboards have laps, joints, trims, end-grain and windows. Every one of those details slows the work and raises the standard required.

The practical DIY trade-offs usually look like this:
-
Time burden
Exterior prep and coating can stretch out over weekends, and weather interruptions make that worse. -
Safety exposure
Ladders, upper-storey work and awkward reaches create risk fast. -
Equipment and materials
Drop sheets, ladders, fillers, primers, sanders, scrapers and wash equipment add up. -
Finish risk
Uneven sanding, visible edges, lap marks and missed moisture issues usually show once the sun hits the wall.
For owners also weighing other exterior maintenance jobs, this guide with tips for painting metal roofs is useful because it highlights a similar principle. Exterior coatings are substrate-specific. What looks simple from the ground often isn't simple in practice.
Why owners still bring in professionals
Paint on timber weatherboards is a protective coating, not just decoration. Heritage guidance treats painted timber exteriors as recurring preservation work because the coating helps reduce moisture ingress, timber decay and UV damage, as outlined in this heritage painting reference for timber exteriors.
That's the main reason owners hire professionals. They're not just paying for labour. They're paying to reduce the chance of coating failure, timber damage and expensive rework.
A professional service usually gives you:
| DIY concern | What a professional handles |
|---|---|
| Unsure what's failing | Identifies whether it's cosmetic wear or system breakdown |
| Incompatible products | Selects a paint system that matches timber and existing coatings |
| Working at height | Uses the right access setup and site controls |
| Unclear scope | Provides a written breakdown of prep, repair and coating stages |
| No comeback if it fails | Includes workmanship accountability |
Newline Painting is one local option for this kind of work in Melbourne. The company uses recognised brands including Dulux, Haymes, Taubmans, Berger and Wattyl, and backs workmanship with a 7-year warranty plus $20M public liability insurance. For a homeowner or property manager, those details matter because they speak to process and accountability, not just whether someone can hold a brush.
Professional weatherboard painting isn't expensive because painters like prep. It costs what it costs because the finish only lasts when the unglamorous work underneath is done properly.
Long-Term Maintenance for Painted Weatherboards
A new exterior finish lasts longer when the owner treats it like maintenance, not a set-and-forget upgrade. Timber weatherboards always perform better when small issues are caught early.
What to do each year
A simple annual check is usually enough to keep minor wear from turning into coating failure.
- Wash the exterior gently to remove dirt, cobwebs and surface grime. Low-pressure cleaning is enough for routine upkeep.
- Inspect sun-hit walls for early fading, cracking or brittle edges.
- Check shaded sides for mould, moss or slow-drying areas near the base of walls.
- Look closely at windows and sills where water tends to sit.
- Monitor gaps and joints around trims, penetrations and board ends.
This doesn't need to be elaborate. A slow walk around the house after winter or at the end of autumn usually tells you where attention is needed.
When to act early
The best time to fix a small issue is when it still looks small. If you catch an opening joint, a failed patch of caulk or a nick through to bare timber, the repair is usually localised. Leave it through another wet season and the surrounding film often starts to lift as well.
For Melbourne homes, that's especially relevant on west-facing walls, lower boards near gardens, and exposed trims in bayside areas. These are the areas where moisture and UV work together to break coatings down faster than the rest of the facade.
A good painter should leave you with a clear idea of what to keep an eye on after handover. That's part of protecting the investment, not an extra.
If your weatherboards are starting to peel, chalk, stain or crack, it's worth getting an on-site assessment before the problem spreads into timber repair. You can request a free quote from Newline Painting or call 1300 044 206 to discuss the scope, paint system and timing for your Melbourne property.