
If you're reading this, you're probably at the point where the walls are no longer the issue on their own. It's the patching that catches the afternoon light, the old roller marks in the hallway, the bathroom wall that never quite dried properly after the last repair, or the flat white in a South Yarra apartment that now shows every scuff. Interior wall painting looks simple from a distance. In practice, the finish you live with is decided by prep, product choice, moisture control, and how disciplined the painter is from quote to handover.
In Melbourne, that matters more than expected. A repaint in a Victorian terrace in Albert Park isn't approached the same way as a newer apartment in Richmond or a Federation home in Kew with old plaster, ornate cornices, and years of movement through the walls. The standard should be a coating system that suits the substrate, the room, and the way the property is used, not just a colour picked from a fan deck.
Table of Contents
- What a Professional Interior Paint Job Includes
- The Professional Interior Painting Process in Melbourne
- Why Surface Preparation Is 90% of the Job
- How to Choose the Right Paint, Colour, and Sheen
- Advanced Finishes for Feature Walls and Heritage Homes
- DIY vs Professional Painting Costs and Timelines
- Maintaining Your New Finish and Our 7-Year Warranty
What a Professional Interior Paint Job Includes
A professional interior wall painting job includes far more than putting two fresh coats over the existing colour. It starts with inspection, substrate assessment, protection of the home, proper preparation, product selection, controlled application, and a handover standard that holds up when the light hits the walls from every angle.
In a Melbourne home, the process changes with the property. A contemporary apartment in South Yarra usually needs tight access planning, dust control, low-odour products, and careful scheduling around residents. An older house in Hawthorn or Camberwell often needs more time on cracks, movement, old patching, timber trim transitions, and stain isolation.
The difference between an average result and a trade-quality one usually comes down to three things:
- The quote is specific: It should define scope, prep, paint system, inclusions, exclusions, and how defects will be handled.
- The prep is detailed: Walls need cleaning, filling, sanding, spot priming, and checking for moisture or staining before any topcoat goes on.
- The finish is controlled: Uniform film build, clean cut lines, consistent sheen, and no runs, sags, skips, or flashing.
Practical rule: If a painter talks mostly about colour and hardly mentions prep, they are talking about the easiest part of the job.
A proper service should also account for occupancy. Many Melbourne repaint projects happen while people are living in the home. That affects room sequencing, ventilation, drying conditions, furniture movement, access hours, and product choice. Bedrooms, nurseries, and apartments with limited airflow need a different approach from an empty investment property being turned around for lease.
The benchmark isn't whether the room looks good initially. It's whether the finish still looks even after curing, whether repaired areas disappear into the wall rather than telegraphing through the paint, and whether the work is backed by real accountability.
The Professional Interior Painting Process in Melbourne
A professional process should be predictable, visible, and documented. That is what keeps timelines realistic and stops small issues from turning into rework once the walls are painted.
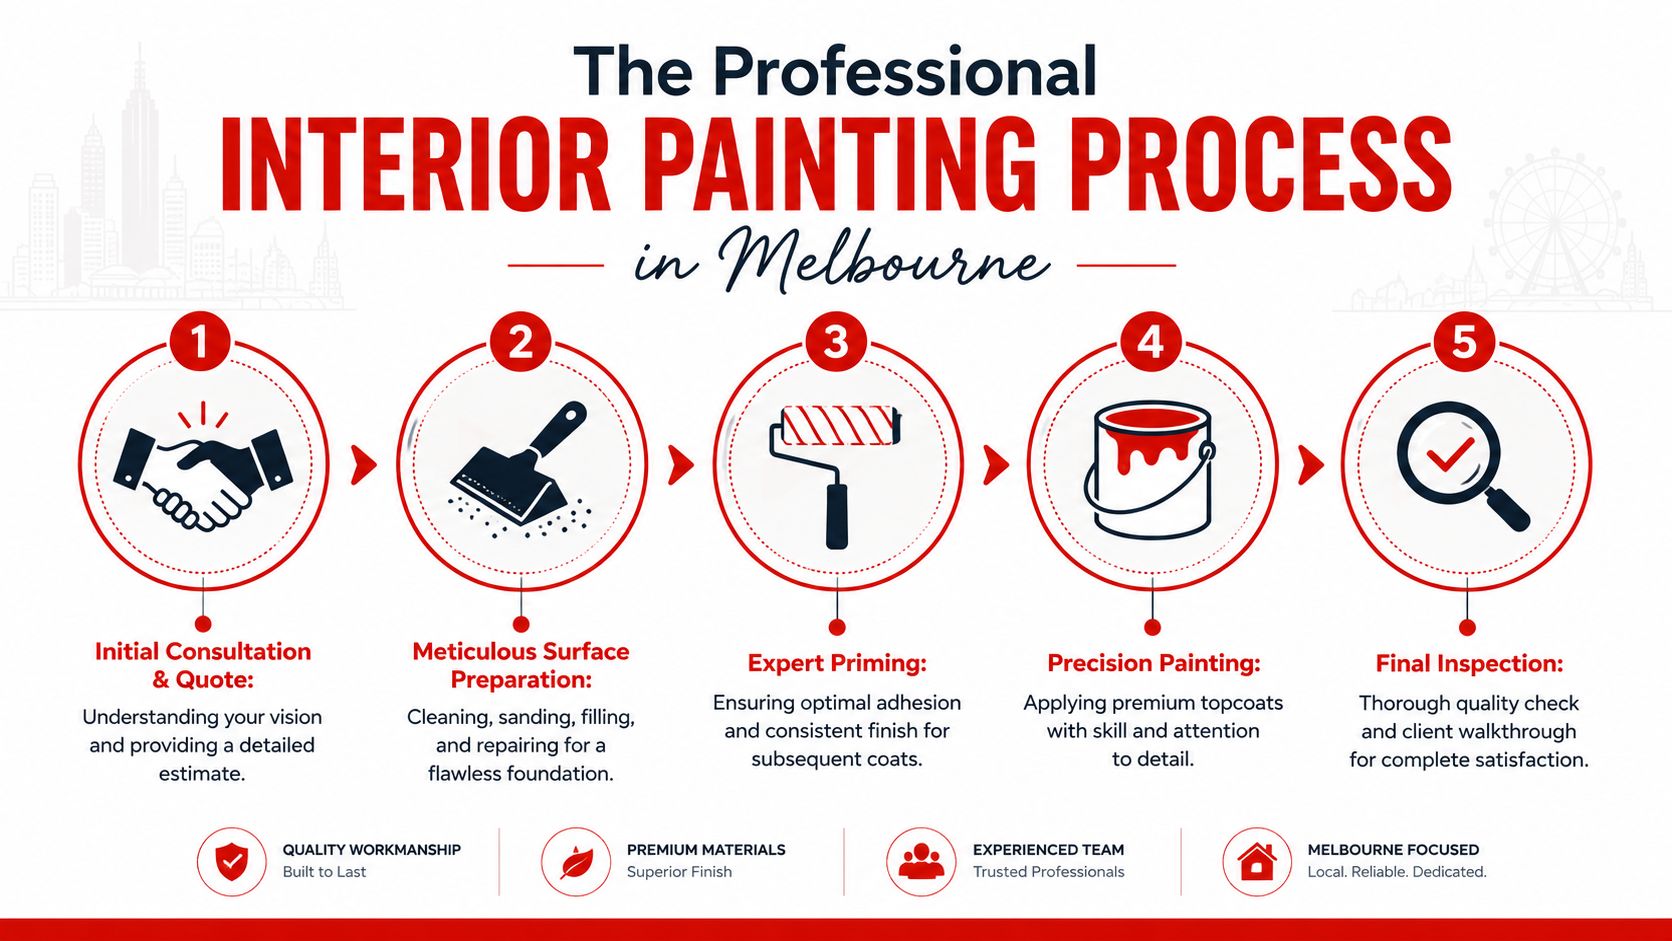
Start with the inspection and written scope
The first step is an on-site inspection, not a guess based on photos. Wall condition, previous coatings, patched areas, access, ceiling height, furniture load, and occupancy all affect the work. In Melbourne apartments, lifts, loading zones, and body corporate access can matter as much as the paint itself.
A proper written quote should set out:
| Item | What should be clear |
|---|---|
| Areas included | Which rooms, walls, ceilings, trims, doors, and exclusions apply |
| Preparation | Cleaning, sanding, filling, crack treatment, stain blocking, spot priming |
| Paint system | Primer or undercoat where required, then the nominated topcoat system |
| Timing | Start window, sequence of rooms, and how disruption will be managed |
| Handover | Final inspection, touch-ups, site clean, and defect review |
If the quote is vague, the job usually is too.
Protect the site before any sanding starts
Good interior wall painting starts with protection. Floors are covered, furniture is moved or wrapped, hardware and plates are removed or masked, and light fittings or nearby surfaces are protected as needed. Specification documents for interior painting make this point clearly. Surfaces should be cleaned and defects corrected before painting, and plates, hardware, light fittings and similar items should be removed or masked before work proceeds, as outlined in interior paint specification requirements for preparation and finish quality.
That sounds basic, but it's where rushed jobs start to show themselves. Paint on hinges, rough masking lines, dust trapped in the finish, and furniture pushed back against tacky walls are all avoidable.
Apply the system in the right order
Once prep is complete, the painter applies the right system for the substrate and room. That might mean a stain-blocking primer on water marks, an undercoat over repaired sections, or a full prime if adhesion or porosity is inconsistent. Then the finish coats go on in sequence, with adequate drying between coats.
A disciplined application process looks like this:
- Set the room up properly: good light, controlled access, tools and materials organised.
- Cut in first: corners, around trims, and detail lines are established cleanly.
- Roll for uniformity: even loading and layoff reduce flashing and texture variation.
- Let coats dry properly: rushing recoat times is one of the fastest ways to compromise the finish.
- Inspect each stage: touch-ups should happen before pack-down, not after the client finds them.
Most clients judge the job by colour first. Professionals judge it by uniformity, edge accuracy, and what the wall looks like in side light.
One painting provider in this market is Newline Painting, which states that jobs begin with a written quote covering scope, preparation, paint system and timelines, followed by site protection and tidy handover. That kind of documented process matters because it makes the work easier to inspect and hold accountable.
Finish with supervision and handover
The last stage is where a job either feels complete or unfinished. A proper final check should look for misses behind doors, roller pickup at light switches, thin coverage over patches, paint nibs, drips, and uneven cut lines at cornices and architraves.
For clients, the useful question isn't "Are you done?" It's "Has the job been checked in the same light I live with every day?" Morning sun in Brighton and late afternoon western light in Malvern will show different flaws. A professional handover accounts for that.
Why Surface Preparation Is 90% of the Job
Preparation is where durability is won or lost. If the substrate is dirty, chalky, damp, glossy, friable, or uneven, the topcoats will only hide the problem briefly.
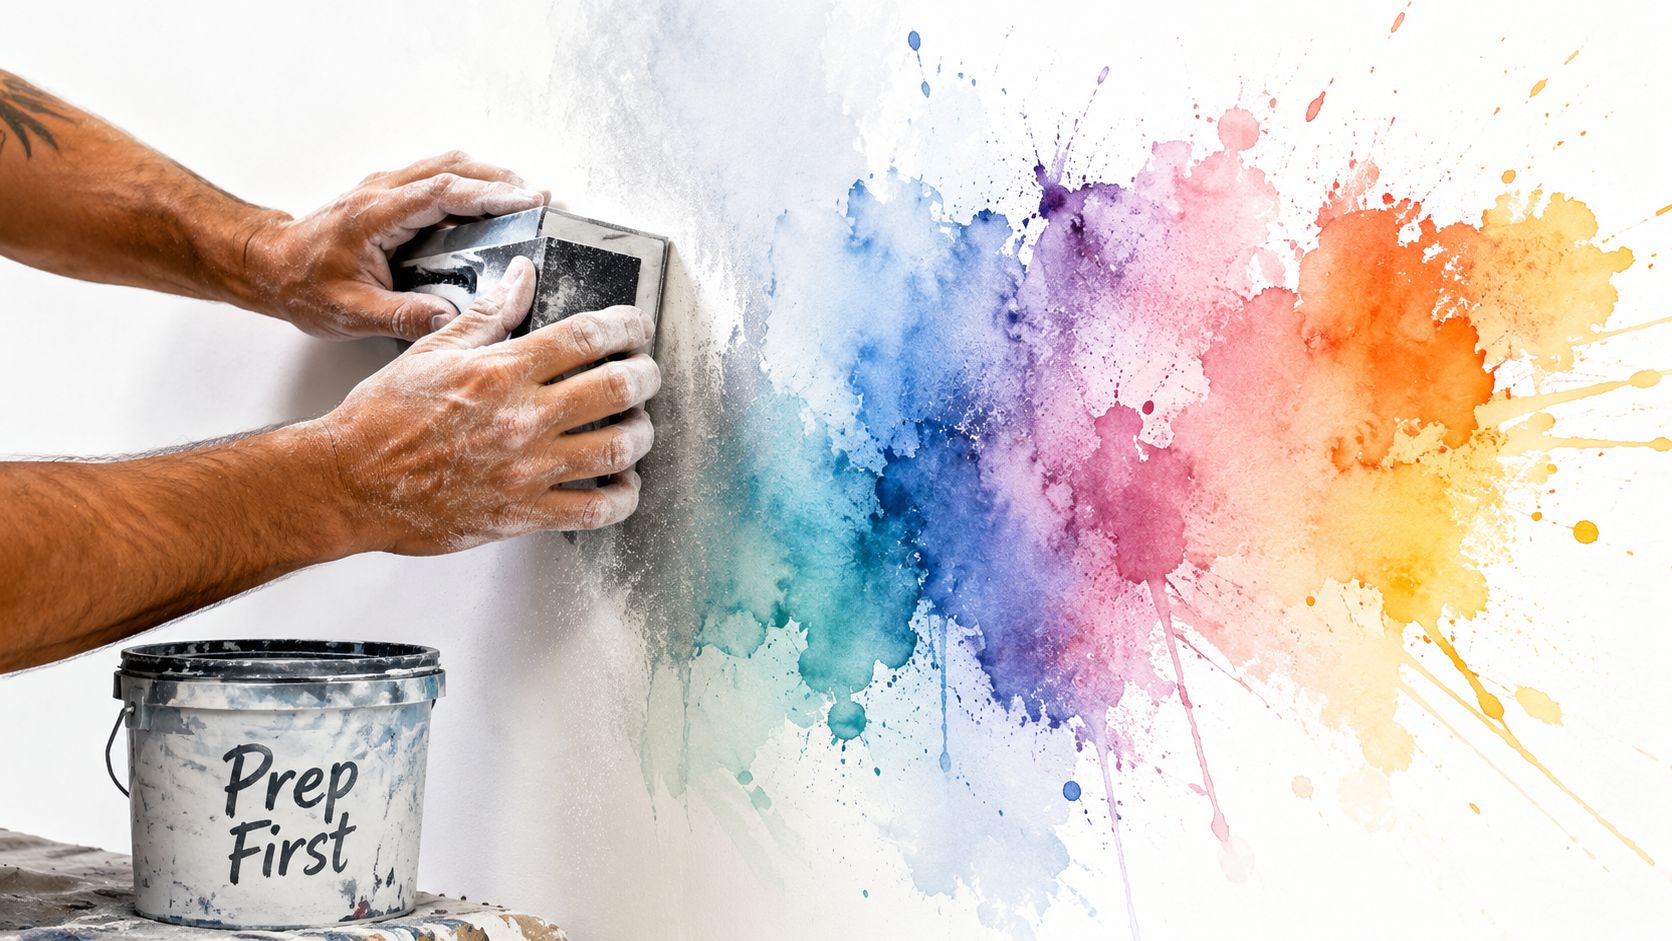
Preparation decides the finish
Walls need to be cleaned before they can be coated properly. In lived-in homes, especially around kitchens, hallways, and children's rooms, the surface often carries grease, hand oils, aerosol residue, and fine dust that interferes with adhesion. Then come the defects: nail pops, settlement cracks, old patch repairs, flaking paint edges, and dents from furniture.
Good prep usually includes:
- Washing contaminated surfaces: especially near kitchens, laundries, and switch plates.
- Scraping and sanding unstable areas: loose edges need to be feathered so they don't print through the finish.
- Filling defects properly: different fillers suit shallow dents, deeper voids, and flexible hairline movement.
- Spot priming repaired zones: patched plaster and bare areas absorb paint differently if left unsealed.
- Dust removal before coating: sanding dust left on the wall weakens adhesion and roughens the finish.
Even premium coatings won't hide a poor base. Interior paint specifications require surfaces to be corrected, cleaned, repaired, and brought to a uniform condition before coating, with attention to film thickness, cut lines, and defects such as runs, sags, skips, and edge accuracy. That's why our step-by-step guide to preparing walls for painting matters as much as colour selection.
Moisture is a hidden failure point
One of the most common reasons interior wall painting fails early is moisture. Bathrooms, laundries, external wall corners, recent plaster repairs, and winter repaint work in Melbourne can all hold more moisture than the surface suggests by touch alone.
Industry paint specifications set maximum moisture thresholds of around 12% for gypsum wallboard and 15% for interior wood, and applying coatings to wetter substrates can interfere with film formation and lead to adhesion loss, blistering, and early failure, according to paint specification guidance on substrate moisture thresholds. In practice, a professional checks with an electronic moisture meter rather than guessing.
A wall can feel dry and still be too wet to paint properly.
This is especially relevant after plaster patching, leak repairs, or winter condensation in apartments with limited ventilation. If there's any sign of mould, staining, or recurring damp, treat the cause before repainting. For readers dealing with mould cleanup before a repaint, these expert mold cleaning tips are a useful starting point, but persistent moisture still needs site-specific assessment before coating.
The prep stage is also where stain-blocking primers earn their keep. Water marks, nicotine, tannin bleed, and unknown legacy stains often come straight back through standard acrylic if they aren't isolated first. That's why experienced painters don't treat every patch the same.
A short visual explanation helps here:
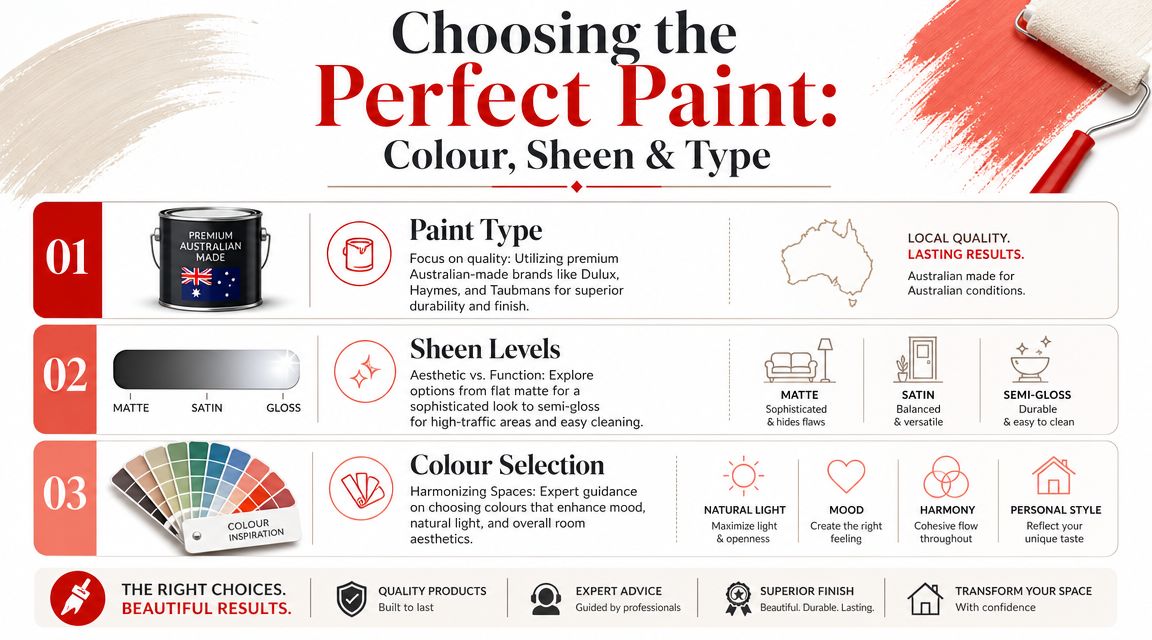
How to Choose the Right Paint, Colour, and Sheen
The right paint system is chosen by room use, light, washability, substrate condition, and who will live with the smell and cure time. Colour matters, but it sits inside a bigger decision.
Match the paint system to the room
For most living areas and bedrooms, an acrylic low-sheen wall paint is the practical default. It gives enough washability for normal use without throwing too much light across minor surface imperfections. In hallways, family zones, and stairwells, washability becomes more important because those areas collect more scuffs and contact.
Ceilings are different. A flat acrylic ceiling finish keeps reflection down and is better at disguising minor undulation in older plaster. Wet areas and high-use rooms often benefit from a more moisture-resistant and more washable finish, provided the substrate is prepared correctly and the room has adequate ventilation.
A simple room-by-room guide looks like this:
| Area | Typical preference | Why it works |
|---|---|---|
| Living rooms and bedrooms | Acrylic low-sheen | Balanced appearance and practical cleanability |
| Hallways and family zones | Durable low-sheen or washable wall finish | Better for marks and regular wiping |
| Kitchens and laundries | More washable interior system | Handles frequent cleaning better |
| Bathrooms | Moisture-conscious interior coating | Better suited to humid conditions when ventilation is managed |
| Ceilings | Flat acrylic | Reduces glare and hides surface variation |
Premium product selection also matters. In Melbourne residential work, painters commonly specify recognised brands such as Dulux, Haymes, Taubmans, Berger, and Wattyl because consistency matters just as much as colour.
Choose colour with the room, not against it
The room should drive the colour choice. Natural light, flooring, benchtops, timber tones, brick fireplaces, existing trims, and the transition into nearby rooms all affect how a wall colour will read. A cool grey that looks clean in a bright display space can turn flat or blue in a south-facing room. A warm neutral can settle an older Edwardian interior or make a newer apartment feel less stark.
For colour testing, the most useful approach is practical:
- Sample on the actual wall: not just on a tiny card.
- Check morning and afternoon light: Melbourne's light changes quickly, especially in winter.
- Review next to fixed finishes: flooring and joinery usually stay longer than paint.
- Limit the shortlist: too many similar whites and greiges creates confusion, not clarity.
If you're choosing between three nearly identical neutrals, the undertone matters more than the label on the swatch.
Occupant health should also shape the specification. The Australian Department of Climate Change, Energy, the Environment and Water notes that indoor air pollution can come from building materials and finishes, and modern low-VOC and zero-VOC paints are designed to reduce that risk by minimising emissions during and after application. That's particularly relevant for occupied homes and tightly sealed apartments, as noted in this discussion of indoor air pollution from building materials and finishes.
If you're comparing matte, low-sheen, satin and gloss options, this guide to paint finishes is a useful reference point before you finalise the schedule.
Advanced Finishes for Feature Walls and Heritage Homes
Advanced finishes work when they suit the architecture and are executed with control. They fail when they're used to chase a trend without respecting the room, the substrate, or the age of the home.

Feature work needs restraint and control
A feature wall can be as simple as a deep low-sheen colour in a bedroom, or as layered as limewash, textured mineral finishes, or decorative effects that shift with light. The key is restraint. In a modern apartment in South Yarra or Armadale, one feature wall often works better than trying to make every room a statement.
What separates good feature work from poor feature work is edge control, substrate uniformity, and consistency across the whole plane. Dark colours and specialty finishes magnify defects. Every old patch, scrape mark, or flashing area becomes more visible once a strong colour or textured finish goes on.
Useful options include:
- Deep feature colours: good for studies, bedrooms, and dining spaces where mood matters.
- Limewash finishes: suited to softer movement and a more natural, layered appearance.
- Decorative plaster or textured looks: effective in restrained applications, usually where the wall is already a focal point.
For property owners considering a statement wall, feature wall painting options for Melbourne homes are worth reviewing before choosing the finish.
Heritage interiors need a different mindset
Heritage homes need patience more than speed. In Richmond terraces, Albert Park cottages, and Federation homes in Kew, walls and trims often carry decades of paint layers, old repairs, and subtle movement. Cornices, ceiling roses, picture rails, architraves, and timber skirtings need a steadier hand than standard project-home detailing.
Ready-to-use paint became commercially available in Australia in 1867, which made periodic interior repainting more accessible for ordinary households and marked a shift away from more labour-intensive finishes, according to historical guidance on the development of ready-to-use paint. That history still matters in Melbourne because many period homes have been repainted repeatedly over long timeframes, and each previous campaign affects the next one.
Older homes rarely reward shortcuts. They reward careful sanding, selective stripping, sympathetic repairs, and paint systems that suit the existing fabric.
In heritage settings, the best result usually isn't the hardest gloss or the sharpest possible modern look. It's a finish that respects profile details, ages naturally, and still gives the client a clean, durable interior they can maintain.
DIY vs Professional Painting Costs and Timelines
DIY painting can work for a small spare room in good condition. It becomes far less efficient once you add patching, high ceilings, ornate details, occupied rooms, or any finish standard above basic coverage.
Where DIY usually blows out
The main cost in DIY interior wall painting isn't only materials. It's time, rework, access gear, surface repair, and the learning curve that happens on your own walls. Homeowners often budget for rollers, brushes, trays, tape, drop sheets, and paint. They don't budget for the second round of filling after the first coat reveals old defects, or the extra weekend spent fixing lap marks and rough cut lines.
DIY also struggles in these situations:
- Large occupied homes: furniture shuffling and room sequencing slows everything down.
- Period properties: ornate trims and uneven surfaces punish rushed prep.
- Dark colour changes: deeper colours tend to expose misses, framing, and inconsistency.
- Repairs and stains: patch visibility and bleed-through are common without the right primers.
The result can still be acceptable, but it rarely looks like a professional finish under side light.
What you are paying for with a professional job
A professional quote covers labour, materials, setup, prep standards, application skill, cleanup, and accountability. It should also cover the less visible parts of the work: protecting floors, masking correctly, dealing with defects before topcoats, and finishing to a standard that can be inspected.
For many clients, a key distinction is risk transfer. If you hire a contractor, you are paying for a process, an outcome standard, and recourse if something goes wrong. With DIY, the burden sits entirely with you.
A balanced comparison looks like this:
| Consideration | DIY | Professional |
|---|---|---|
| Up-front outlay | Lower on paper | Higher because labour is included |
| Time demand | Usually much higher | Managed by a team and schedule |
| Finish consistency | Depends on your skill and patience | More controlled when prep and application are disciplined |
| Defect handling | Trial and error | Identified and treated as part of the system |
| Accountability | None beyond your own time | Insurance, written scope, and workmanship backing |
In Melbourne, professional painting also makes more sense when the property is being prepared for sale, handed back to tenants, or refreshed between settlements and leasing campaigns. Timing matters in those jobs, and so does presentation.
A practical differentiator is cover and warranty. Work carried out by a contractor with $20M public liability insurance and a 7-year workmanship warranty gives the client a level of protection a DIY project cannot offer.
Maintaining Your New Finish and Our 7-Year Warranty
A new finish lasts longer when it is cleaned gently and used as intended. Most interior walls don't need aggressive washing. They need light maintenance done early, before marks are worked deeper into the film.
How to keep walls looking fresh
For routine care, use a soft cloth or sponge with mild pH-neutral detergent and avoid abrasive scourers. Spot clean rather than scrubbing whole wall sections, and test in a low-visibility area first if you're unsure how the finish will respond. Kitchens, hallways, and around light switches usually need more regular attention than formal rooms.
A few habits make a difference:
- Wipe marks early: fresh scuffs are easier to remove than set-in grime.
- Keep moisture managed: bathrooms and laundries last better when ventilation is used properly.
- Avoid harsh cleaners: strong chemicals can dull or soften some finishes.
- Retain leftover paint: labelled touch-up paint helps with minor future maintenance.
Good maintenance is simple. Clean lightly, deal with marks early, and don't attack painted walls with abrasive products.
Why the warranty matters
A workmanship warranty matters because repainting isn't only about colour. It is about whether the prep was adequate, whether the right system was used, and whether the work will hold up under normal use. A 7-year workmanship warranty signals that the contractor is prepared to stand behind the application standard, not just the day-one appearance.
That matters even more in occupied homes, where walls are judged over time rather than at handover. The useful question for clients isn't whether the room looked clean when the drop sheets came up. It's whether the finish was built to last through daily use, changing light, and normal wear.
If you're planning interior wall painting in Melbourne and want a clear scope, a written quote, and a finish backed by a 7-year workmanship warranty, contact Newline Painting to arrange a free on-site quote or call 1300 044 206.